Social logins
Summary
Note
This article explains how to set up your system to allow end users to use their social media profiles to create an account and login directly to your services.
Table of contents
- Introduction
- Setting up social logins
- Single-sign on using Google
- OAuth consent screens
- Test and verification
- Single sign-on using Facebook
- Alternative options
- Testing, verification and publish
- Single sign on using Apple
- Associated articles
Introduction
Cortex provides a comprehensive range of services for user authentication, authorisation and secure single sign-on using recognised standards, as detailed in the document: OAuth 2.0 and OpenID Connect. One of the services offered is to allow your end users to use their social media logins with either Google or Facebook to create an account and use it as a single sign-on profile for the provided platforms. This removes the need for them to create an account and log in with a dedicated email address, username and password.
Setting up social logins
Currently, Cortex provides the facility to use social media logins from Google and Facebook. This section steps through how to set up the service for each of these social logins.
Single-sign on using Google
This section runs through the process for setting up the facility for end users to log in using their Google account.
- Enter the project creation area of Google by clicking on their Project creation environment.
The environment can be accessed with any Google Mail account, and you will be invited to create a new project.
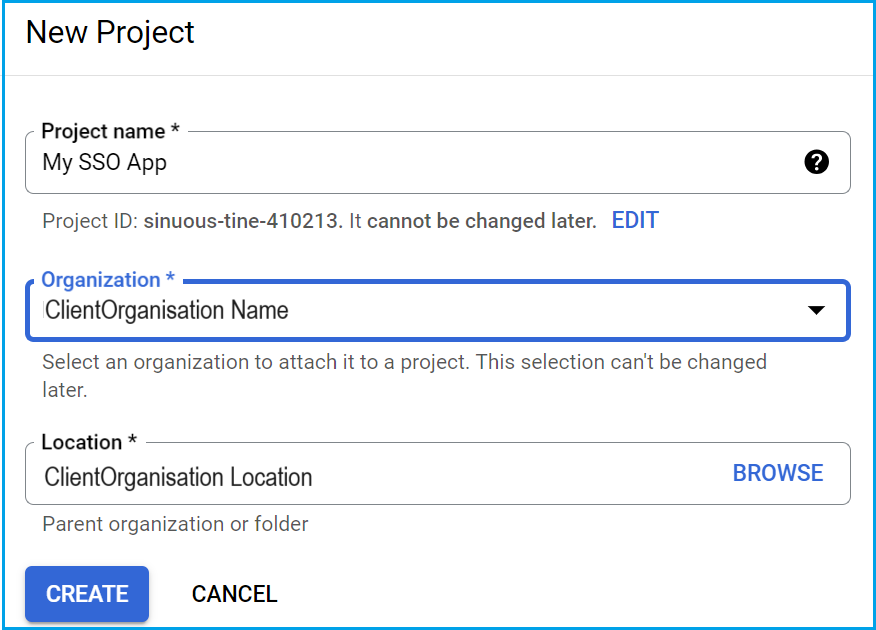

Give the project a relevant name, assign your Organisation and Location, and click Create.
- In the menu down the left-hand side, select APIs & Services and from the drop-down list, select Credentials.
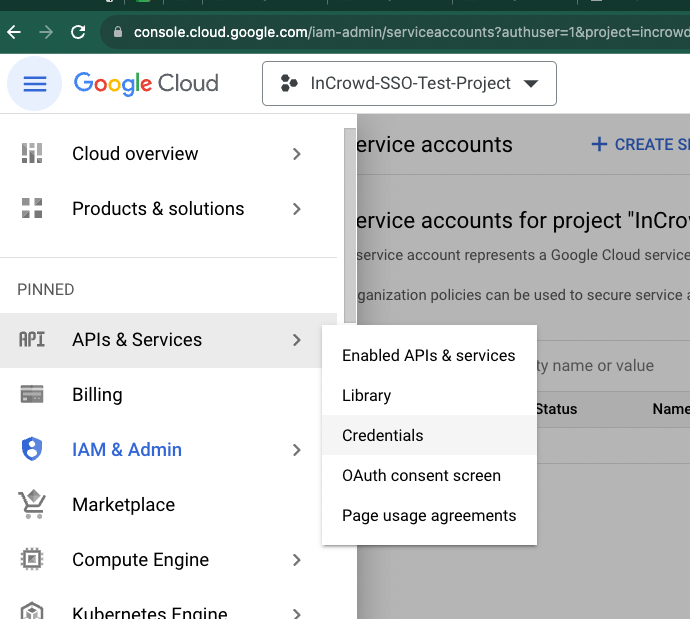
- The Credentials screen is presented in the central panel.
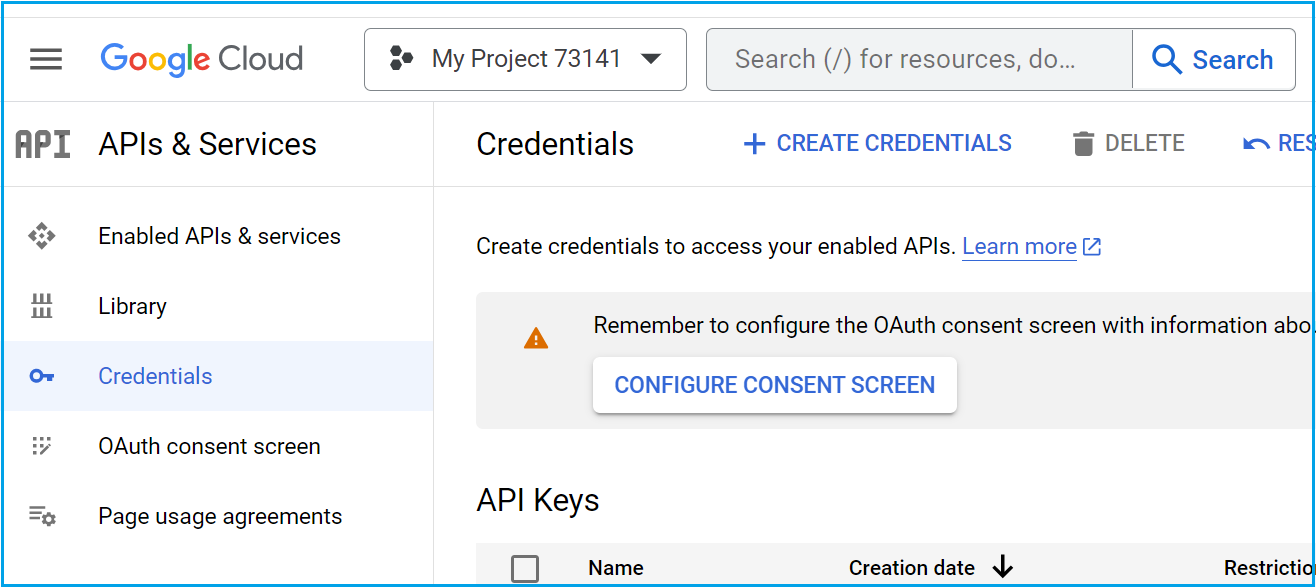
One of two things may happen here. If this is your first project creation, click Configure Consent Screen.
Note
If the process does not require the consent screens to be configured at this point, move on to step 5, below.
- The Consent screen is next. Select the External radio button. This will allow users from outside your organisation to login with their Google profile data.
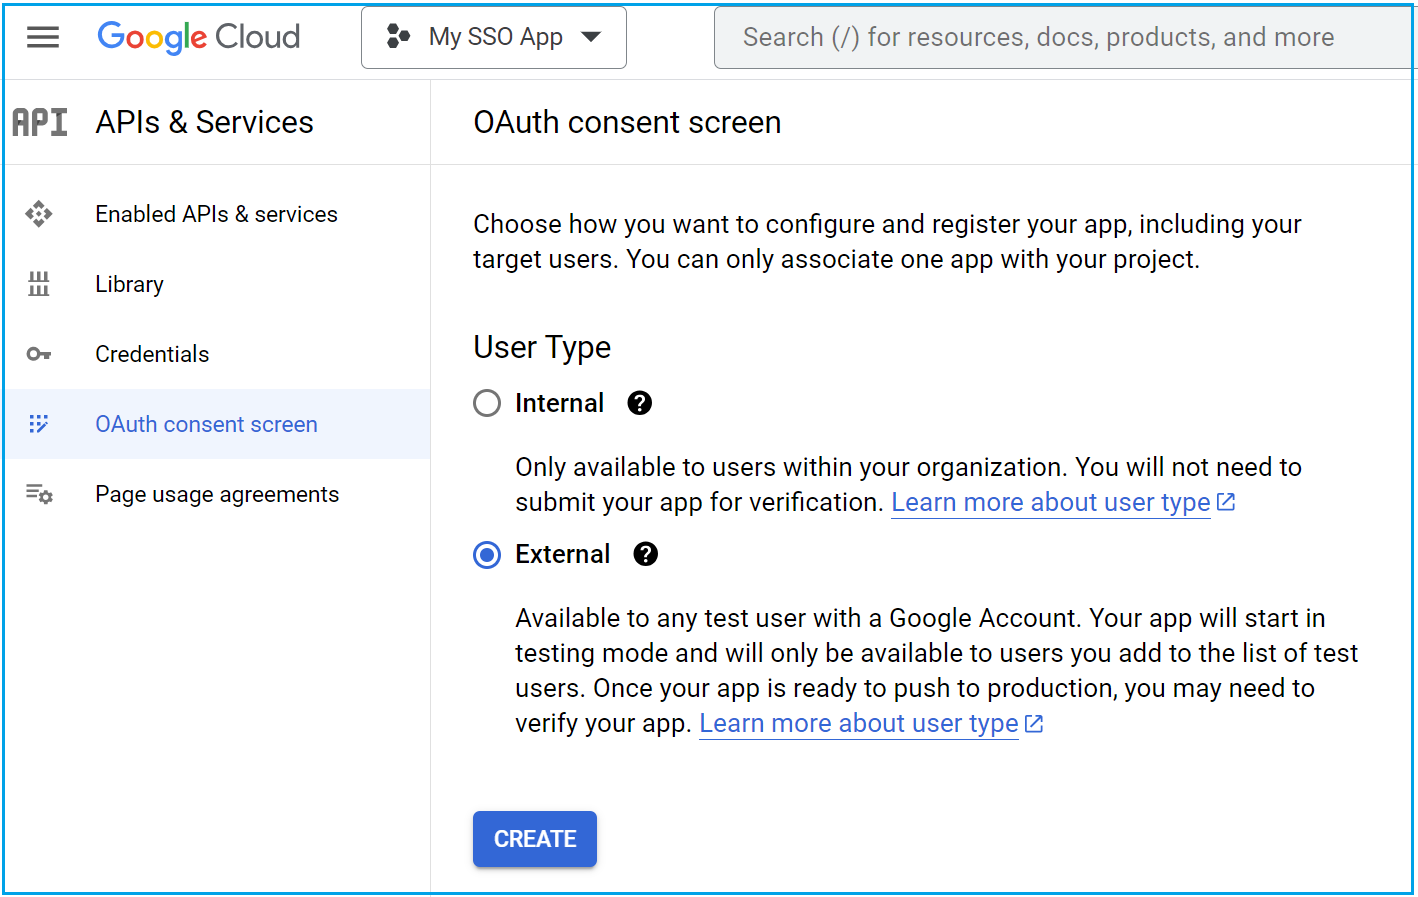

Further details are discussed and provided in the next section, OAuth Consent Screens, below.
Now click Create.
- Within the Credentials screen, select the Create Credentials tab along the top, and from the drop-down menu that results, select OAuth client ID.
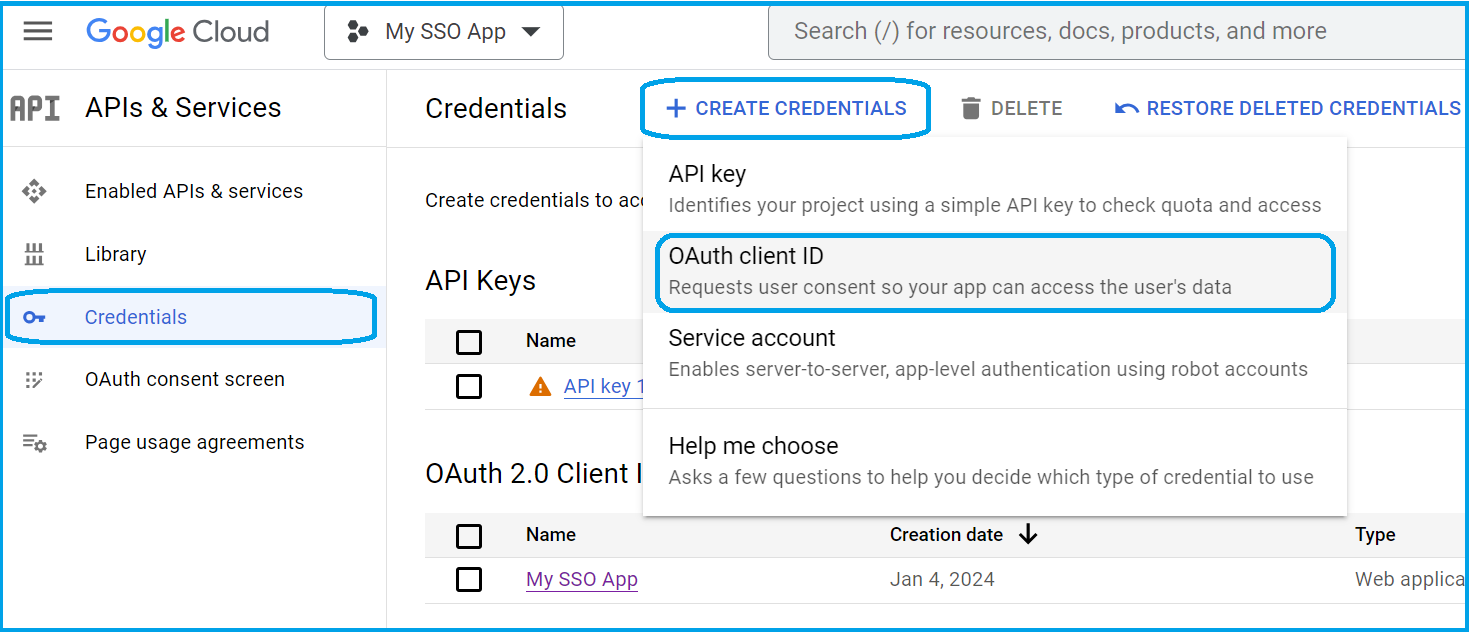

- You are presented with the Create OAuth client ID interface.
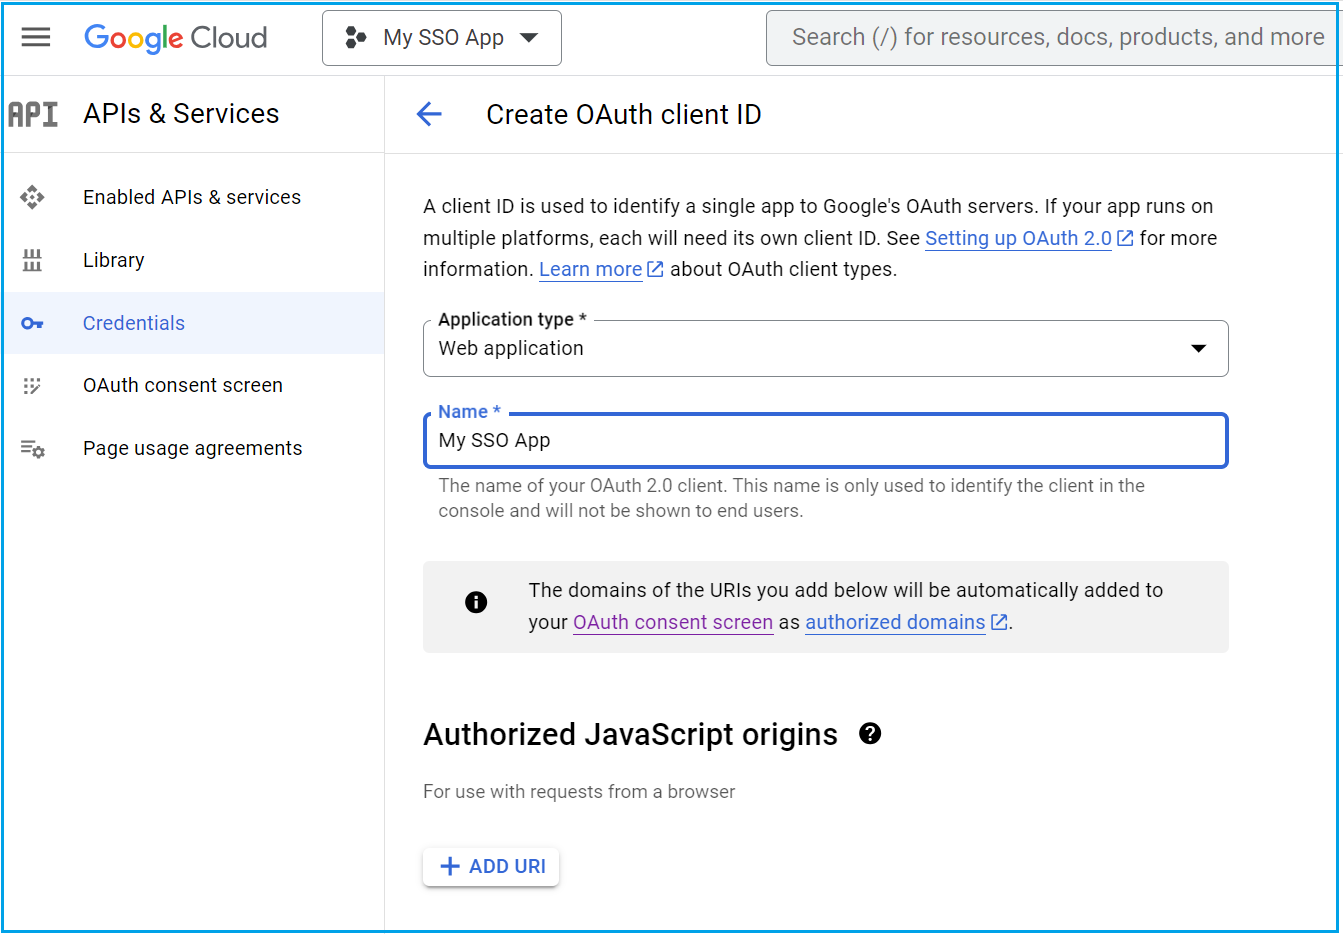
- Select Web application as the application type and enter an intuitively useful name. This name is only used to identify the client in the console and is not shown to end users.
Now enter the screens for Authorized JavaScript origins by clicking Add URI.
The URI (Uniform Resource Identifier) is the address of the homepage for the site Cortex has provided to you for single sign-on purposes. It should include the scheme and fully qualified hostname only. For example, https://www.example.com.
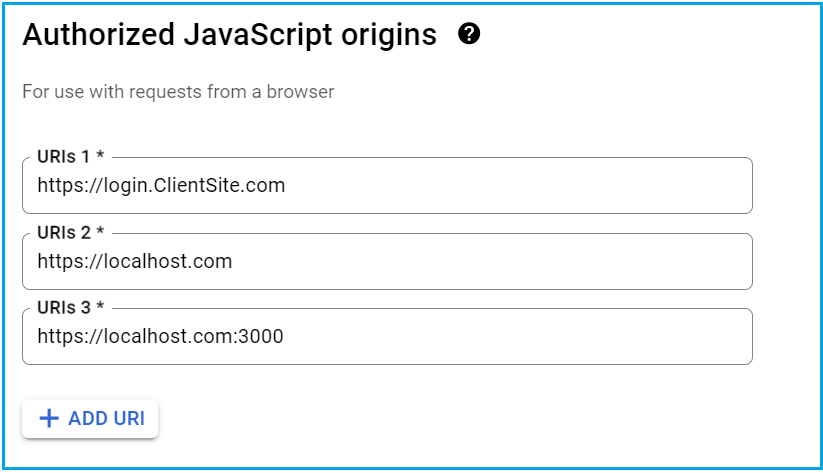
Note
For local tests or development add bothhttp://localhostandhttp://localhost:<port_number>WARNING!
Google One Tap can only be displayed in https:// domains - this includes localhost so you may need to make your localhost https://. See the Nuxt2 guide How to run NUXT with HTTPS in localhost and the Nuxt3 Configuration Guide.
Scroll to the bottom of the section and click Create.
- Once the OAuth client has been created (which may take a little time), the dashboard summary will show the OAuth 2.0 client IDs created.
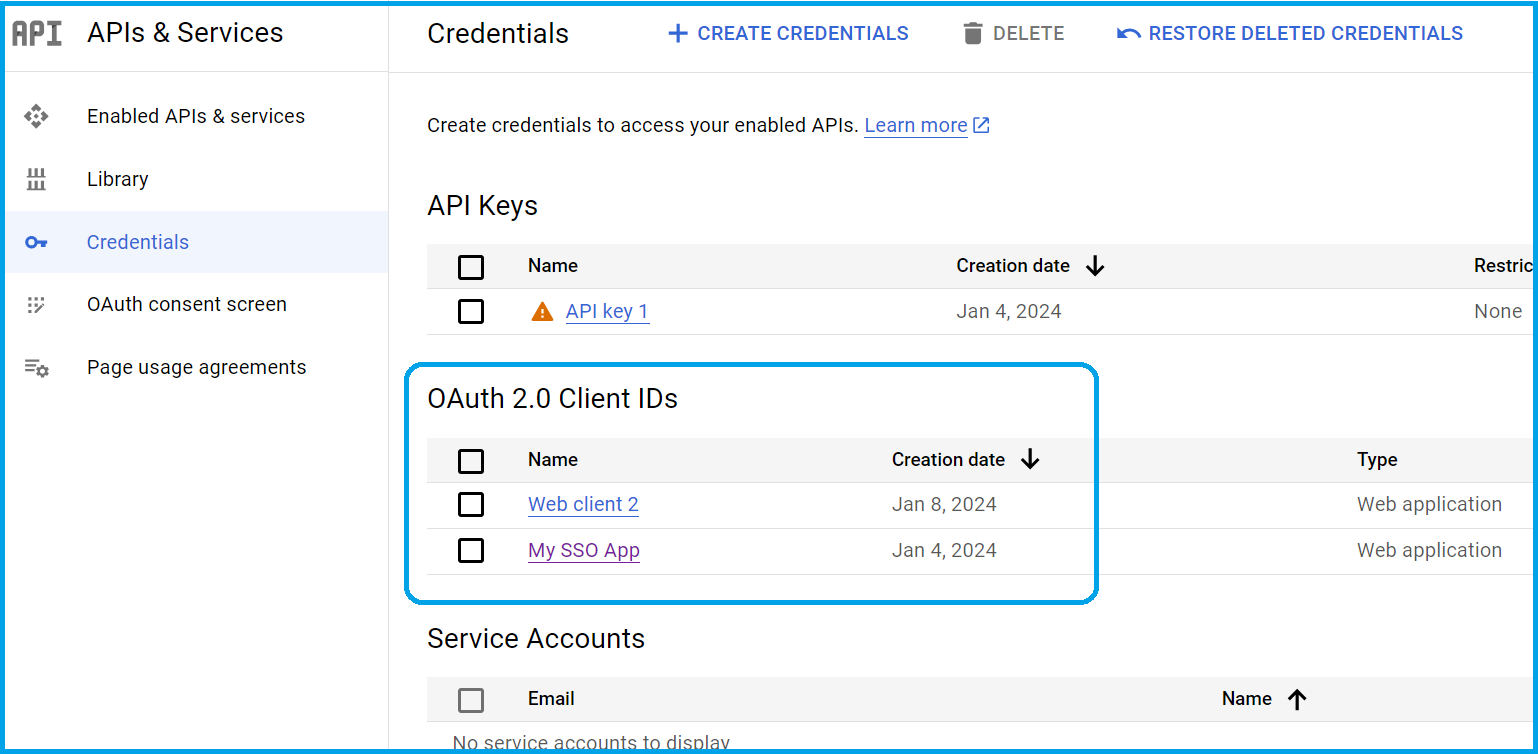
- Click on the Name of the OAuth 2.0 client ID you have created.
The Client ID for web application page is displayed.
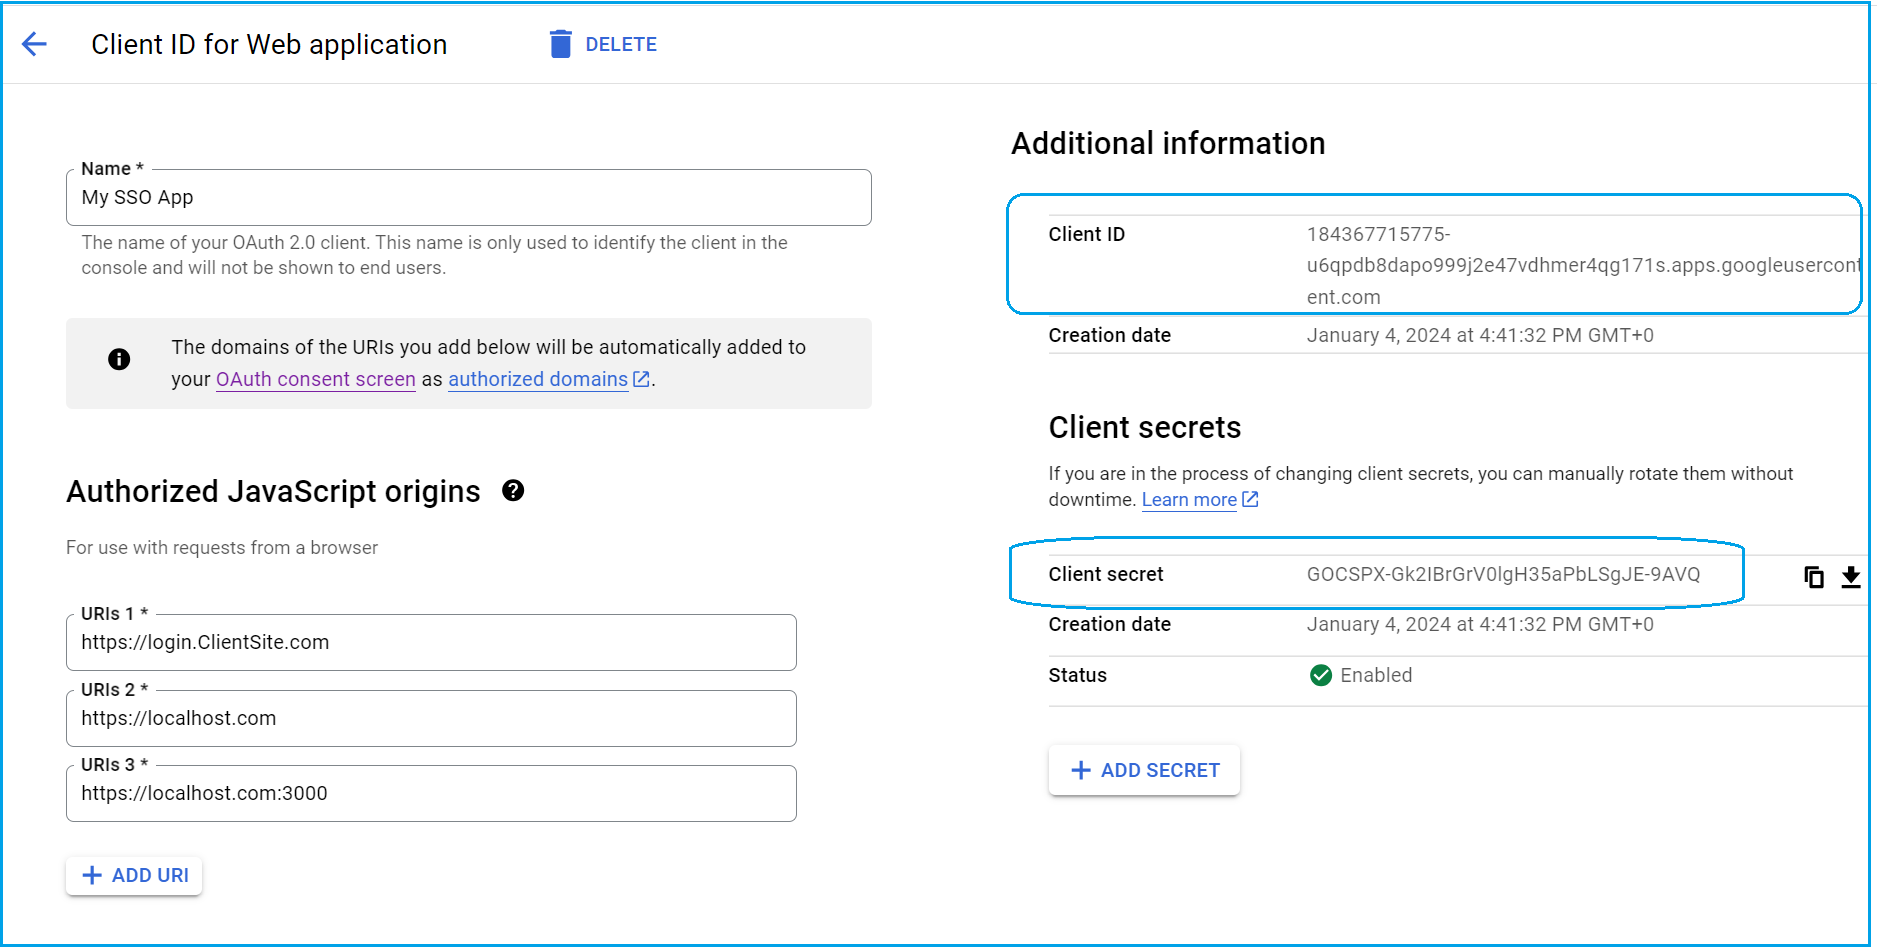
Note the Client ID and the Client secret for the application, highlighted on the right-hand side of the screenshot above. Both of these will later be required by the server-side team to set up the SSO capability, so copy these down and communicate them to your Cortex administrator or development partners.
OAuth consent screens
Next, complete the following steps to configure OAuth consent:
- In the left-hand menu, select the OAuth consent screen tab.
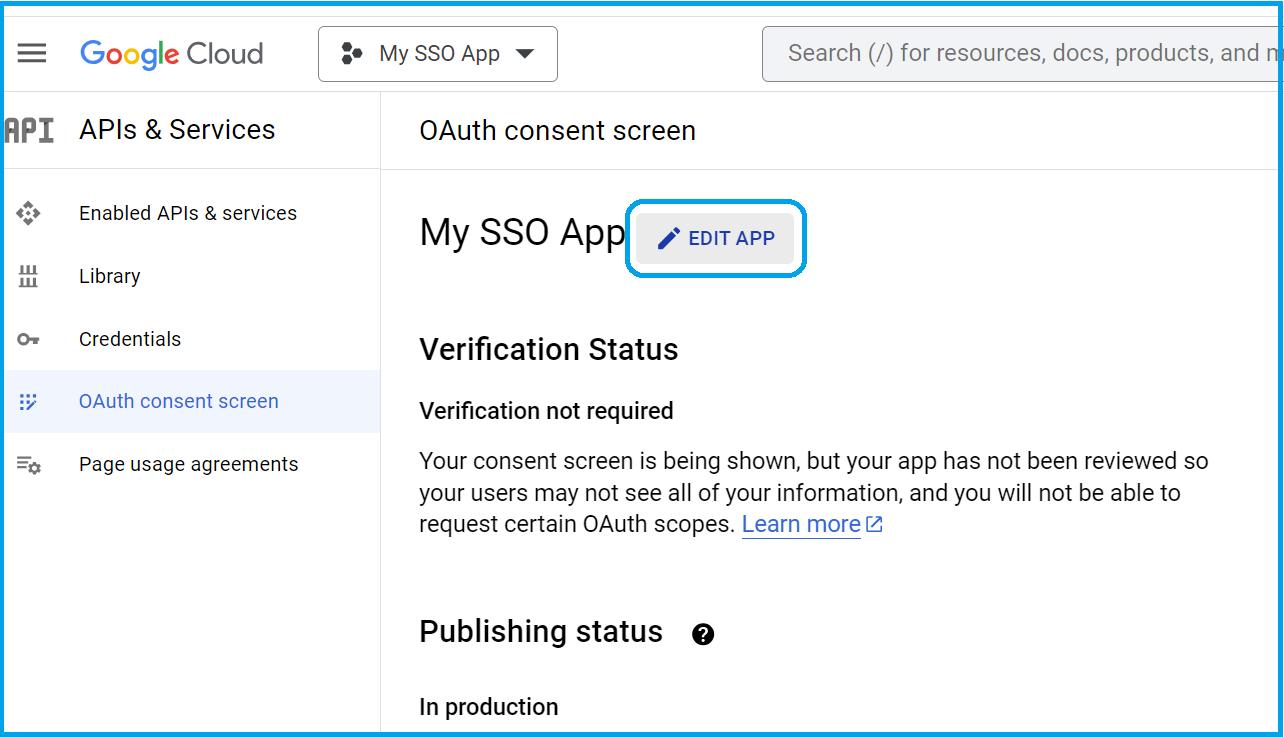

On the OAuth consent screen, next to your app name, select Edit app.
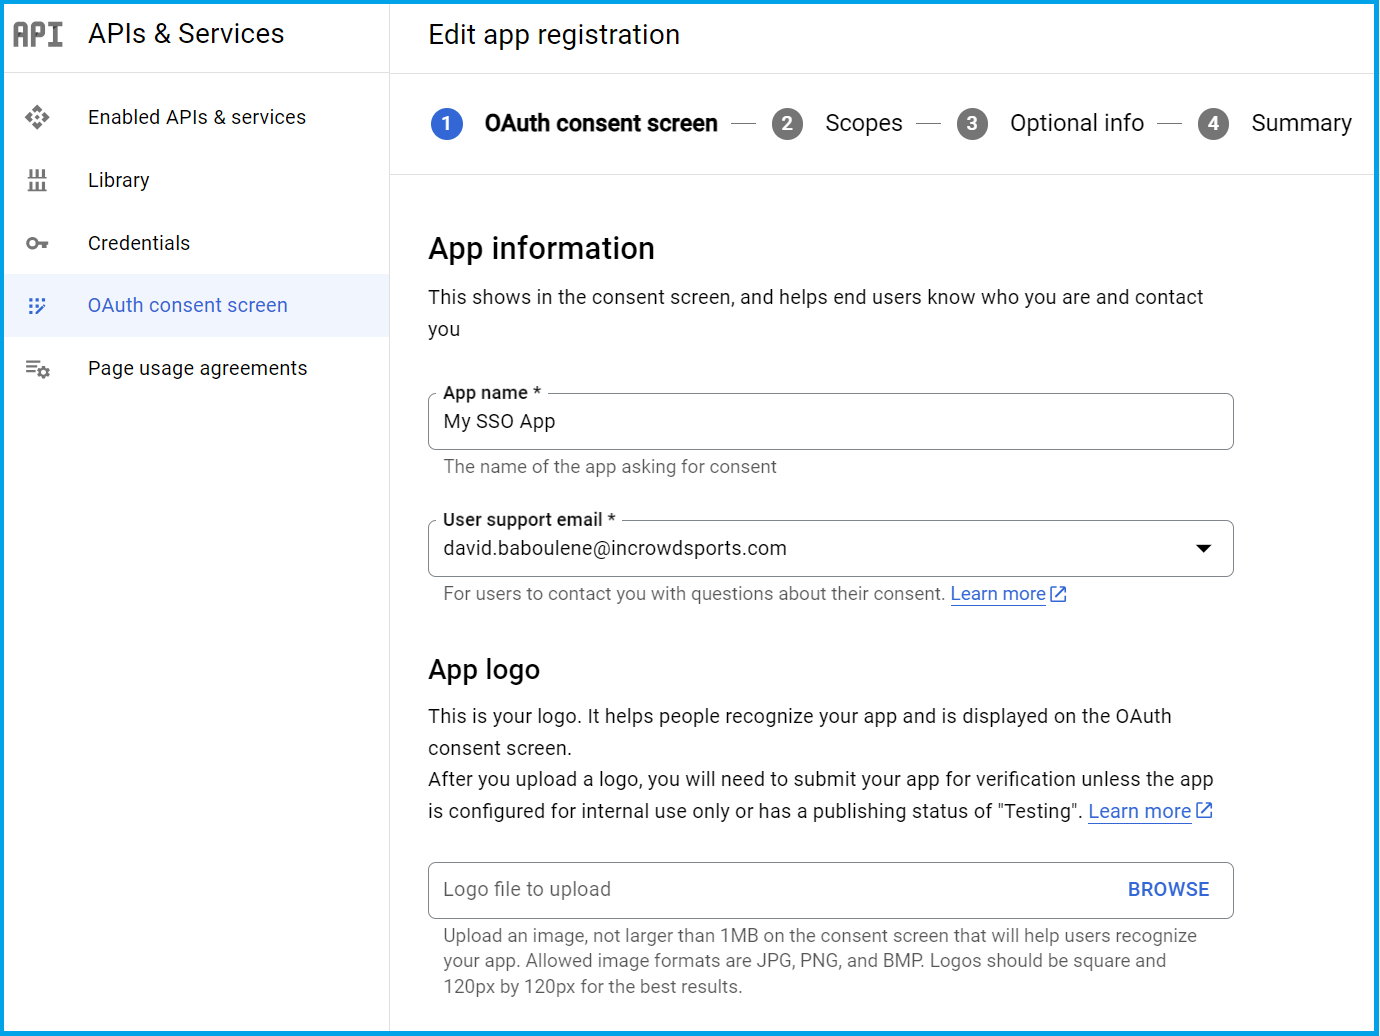
- You are taken to the Edit app registration page. Enter the information requested - the Application name, provide a Support email address and assign an App logo if you have one. (This can be left until later if necessary.)
Scroll down the page to enter your App domain information.
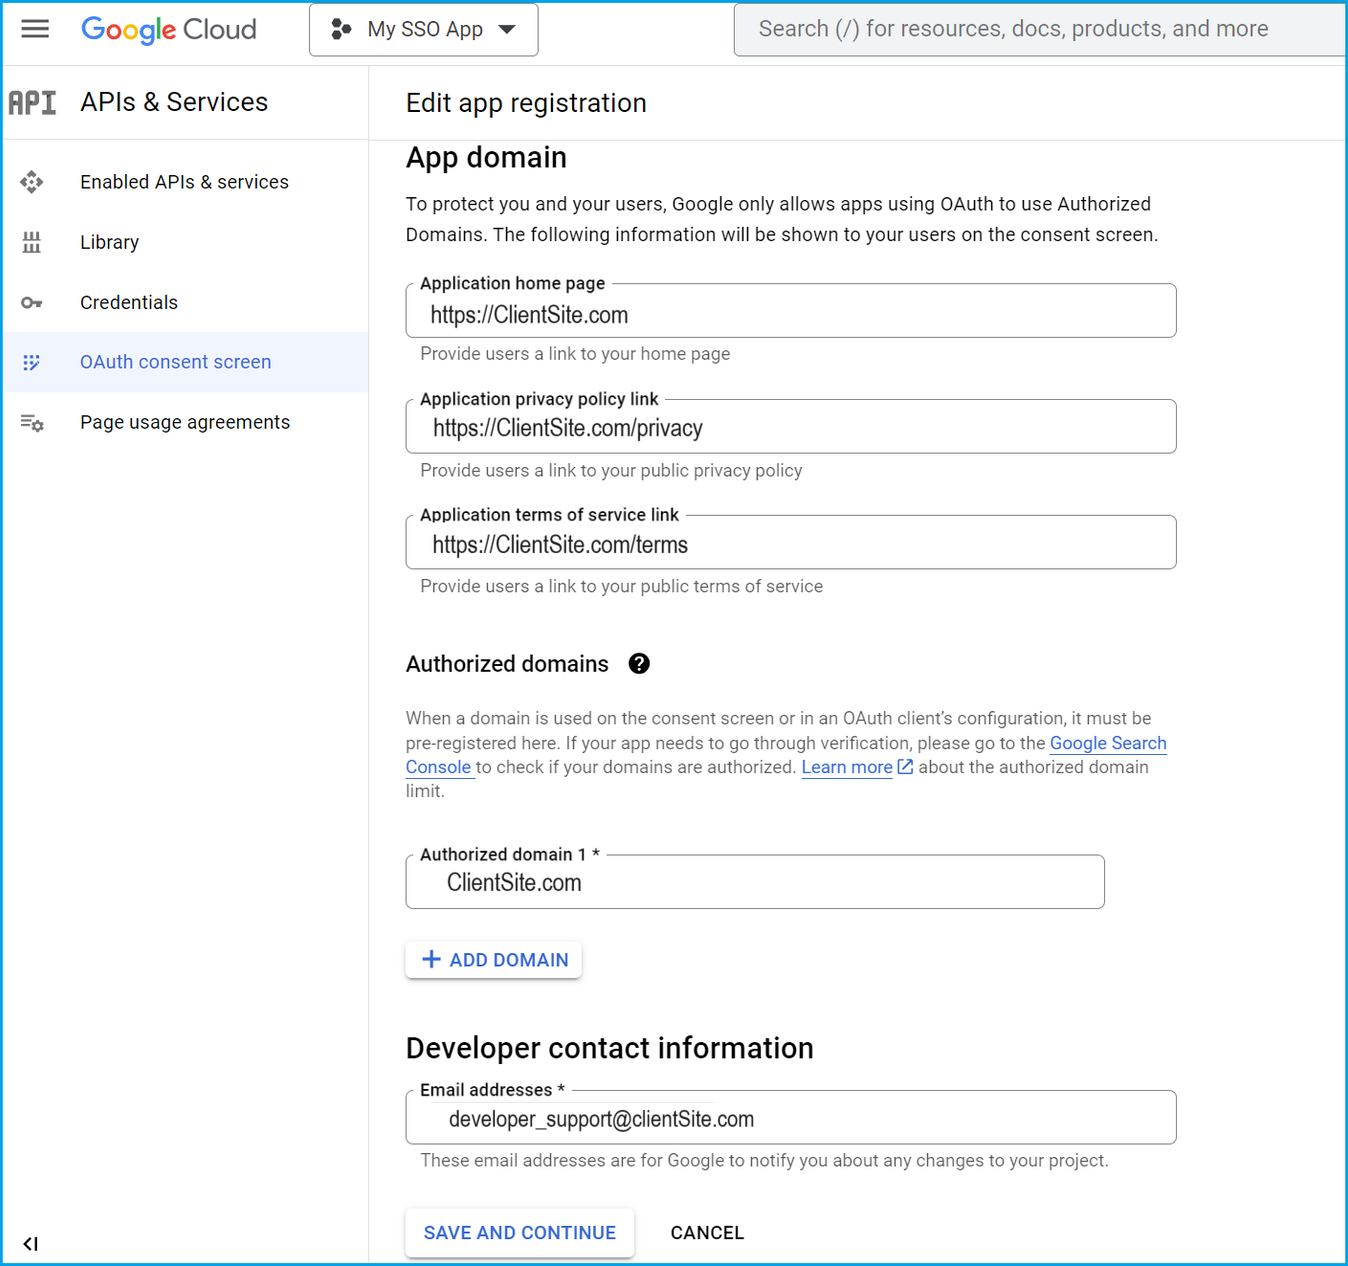
Enter the Application home page address and URLs for the Privacy policy and Terms of service. It is also mandatory to provide at least one Authorised domain. Finally, a contact email address to whom Google will send relevant supporting information.
- Click Save and continue. You are presented with the Scopes interface.
Click Add or remove scopes. Scopes set the permissions you request users to authorise for your app and allow your project to access specific types of private user data from their Google Account.
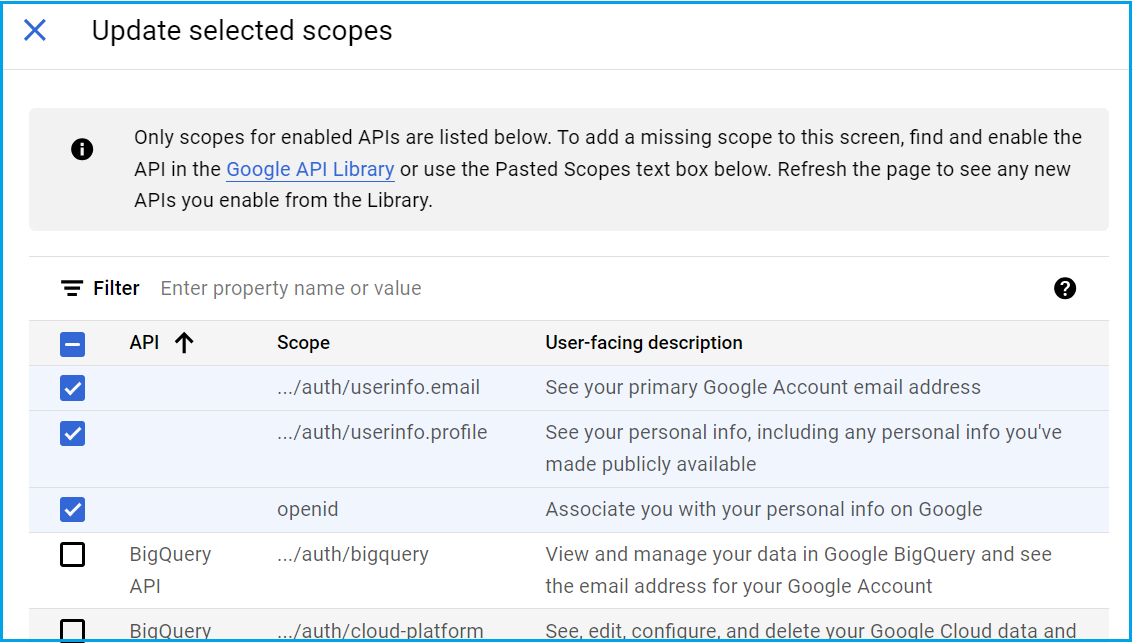
- From the list of scopes presented, select:
.../auth/Userinfo.email
.../auth/userinfo.profile
openid
- Scroll to the bottom and click Update.
This returns you to the Scopes screen. The scopes you have previously added are listed beneath the Add or remove scopes button.
Test and verification
Click Save and continue to be taken to the Test users interface.
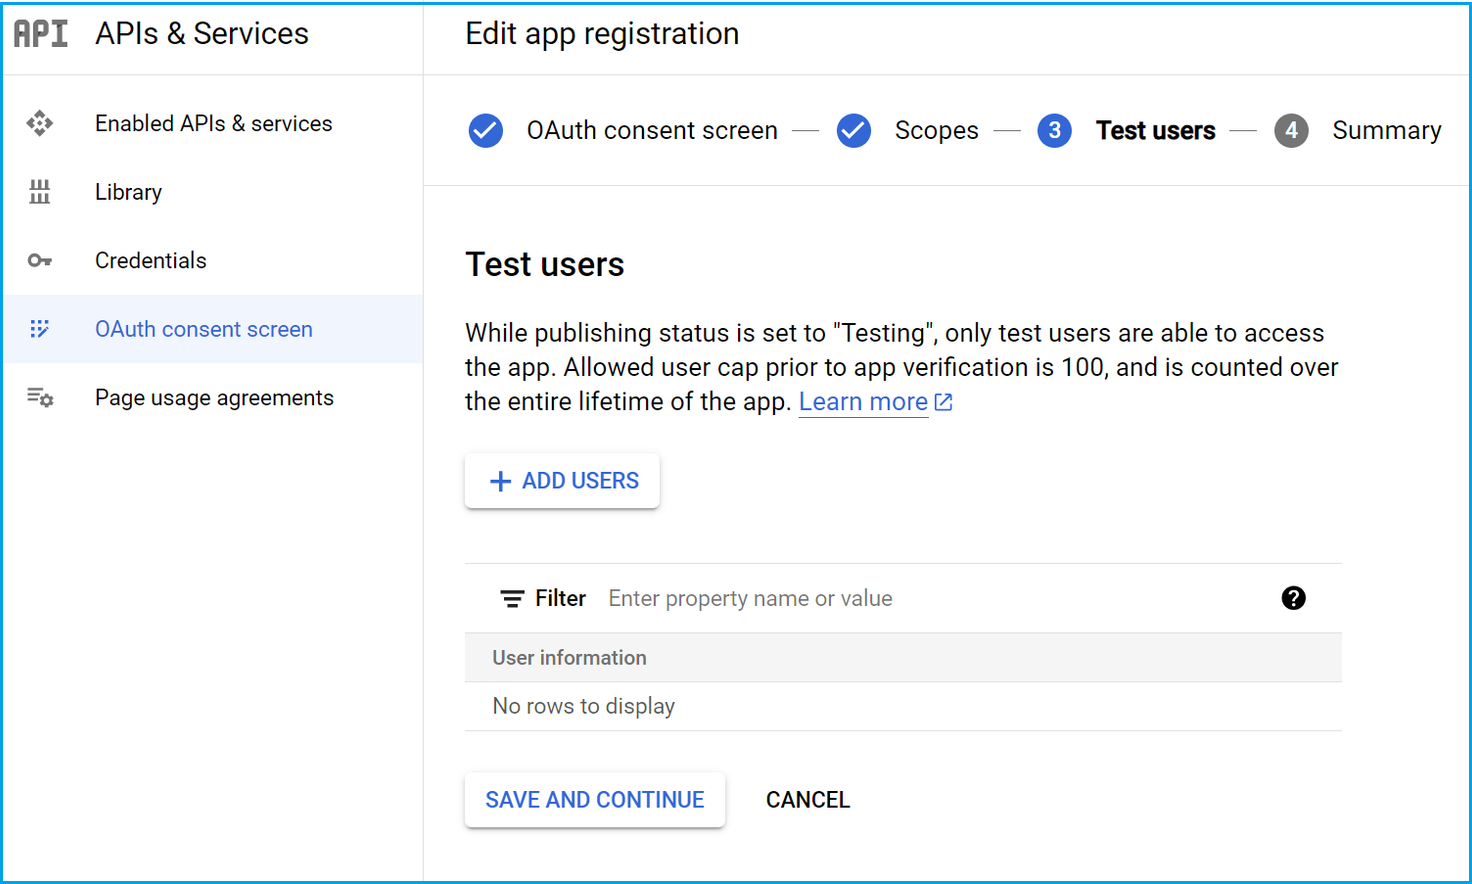
- While the app is not published, only assigned test users can access the app. Add the users who will participate in the test process. Note that all test users must have a valid Google account.
Click Save and continue. - A summary screen of your configuration and choices is displayed. Check the information and click Return to dashboard, where the option is available to click Publish app.
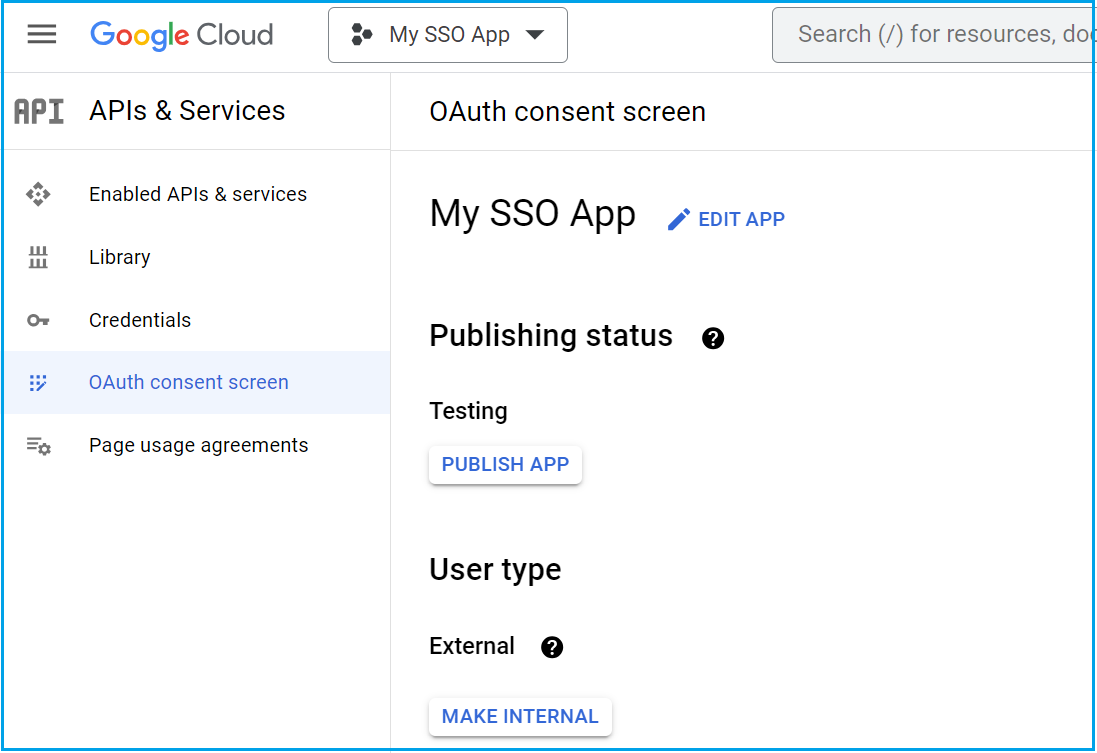
- Follow the specific verification and publication process that Google requests for your circumstances. Once publication is complete, the app is available for users. Anyone, including those not on the test user list, is now able to authenticate. However, the app remains available for edit in the central panel of the dashboard.
Note
A quota increase may be required if the default of 10,000 per day might be exceeded. Click here for Google’s process for requesting a default increase.Note
Further Documentation: https://developers.google.com/identity/gsi/web/guides/overview
Single sign-on using Facebook
Facebook Login works seamlessly across iPhones, Android devices, smart TVs, and more. There is also the option for what is known as a ‘limited’ login, in which the use of Facebook Login will not be used to personalise or measure advertising effectiveness.
To get started, the client must have a Facebook account with access to the developer portal. Cortex has a shared developer account which can be used by clients to share their progress. Ask your team or technical lead for access.
WARNING!
Note that Facebook review and approval times are up to ten days. Ensure implementation is done well in advance to allow for this and for the potential requirement for further changes.
Before developer work can begin, you must be registered with Facebook as a developer and some preparations must take place.
- Go to The Facebook internal documentation here: https://developers.facebook.com/docs/development/create-an-app. Go through the preparation steps with Facebook.
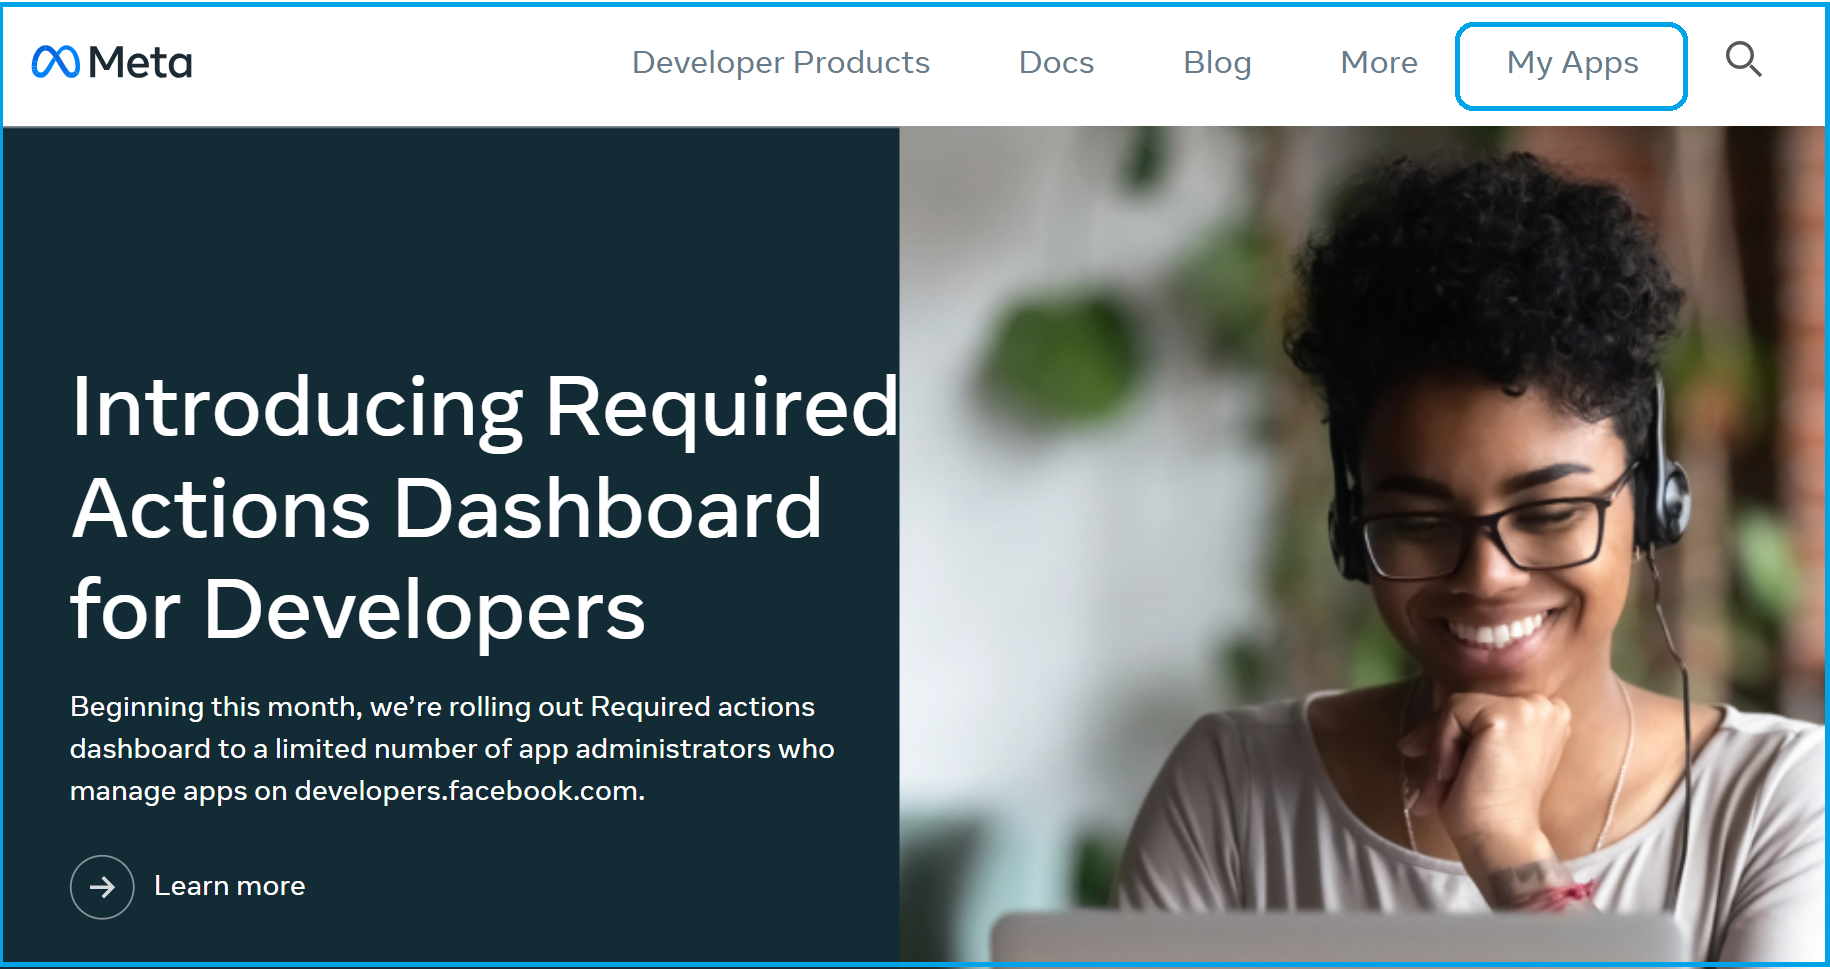
- Once you have a developer account, go to the developer page at https://developers.facebook.com/
Click on My Apps in the top-right.

- You are presented with the Create an app interface.
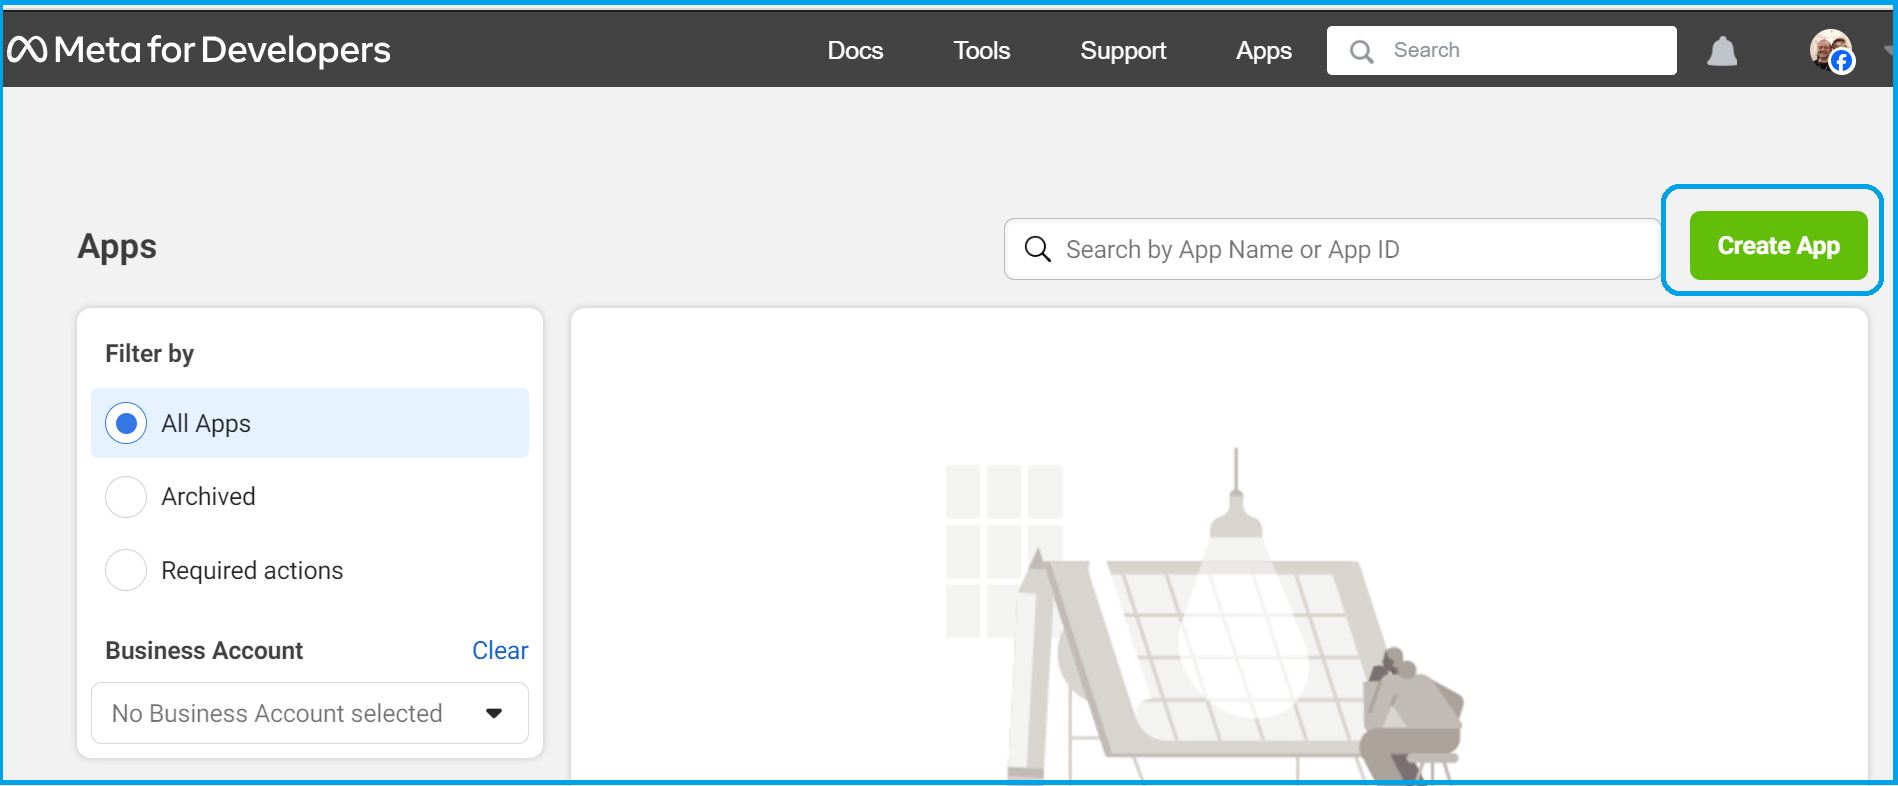
Select Create app. At the following screen, select the option to Authenticate and request data from users with Facebook login.
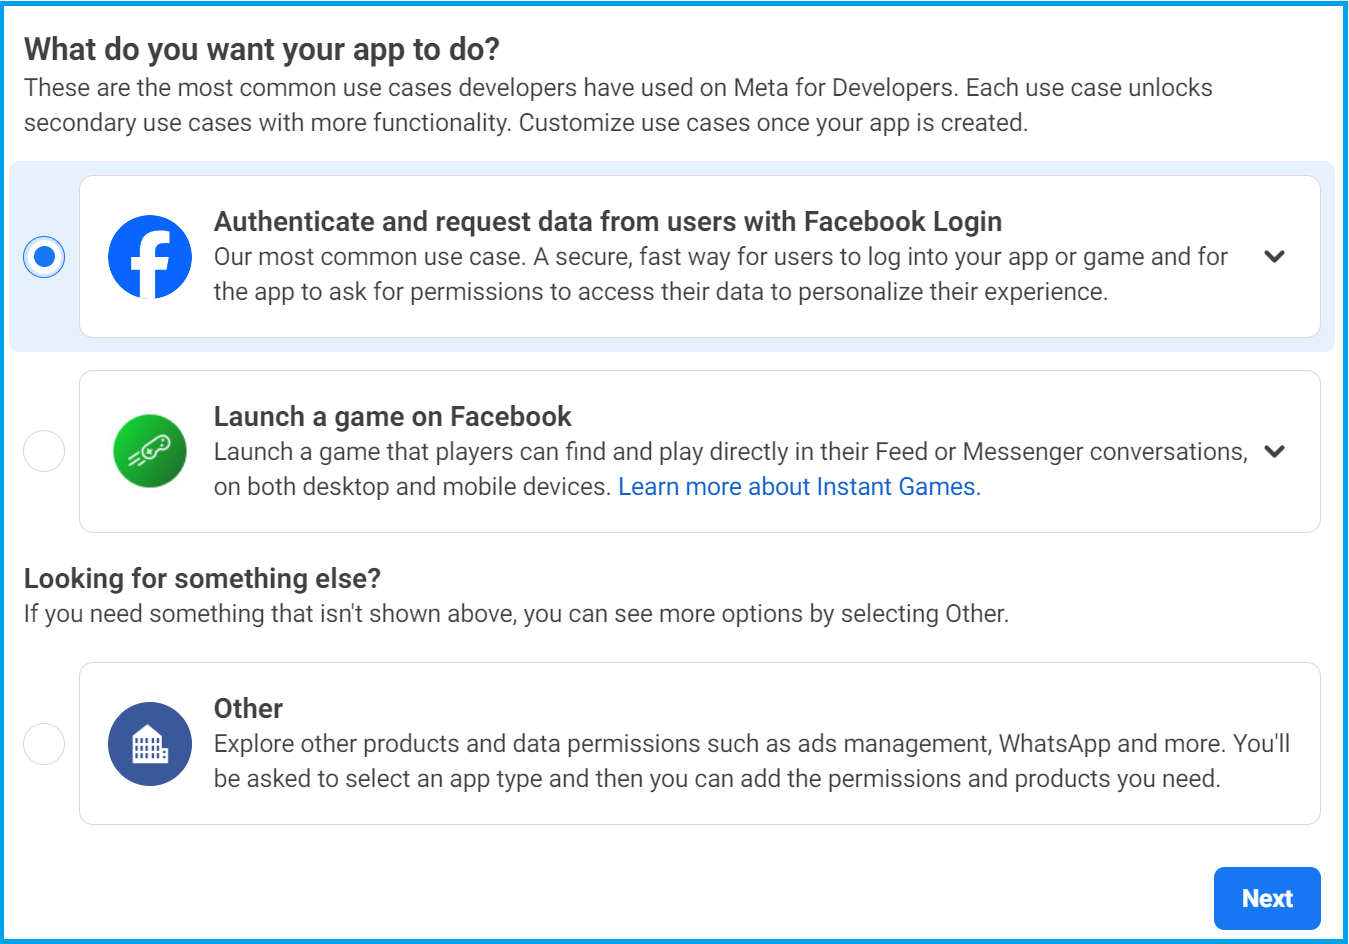
- Click Next and at the subsequent screen, select No, I am not building a game, and again, click Next.
You are presented with further app options.
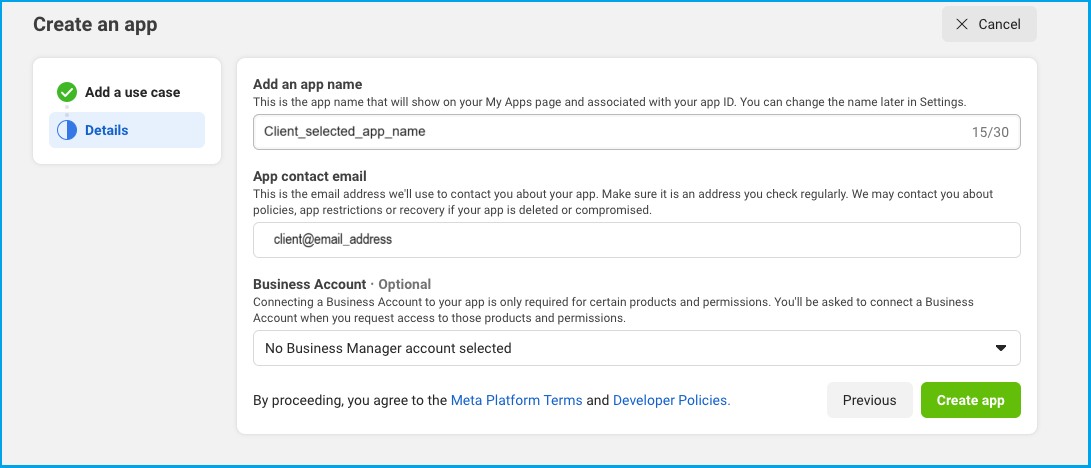
- In the appropriate fields, enter an app name and a contact email address that is controlled by you. Then click Create app.
- You are presented with the App edit screen.
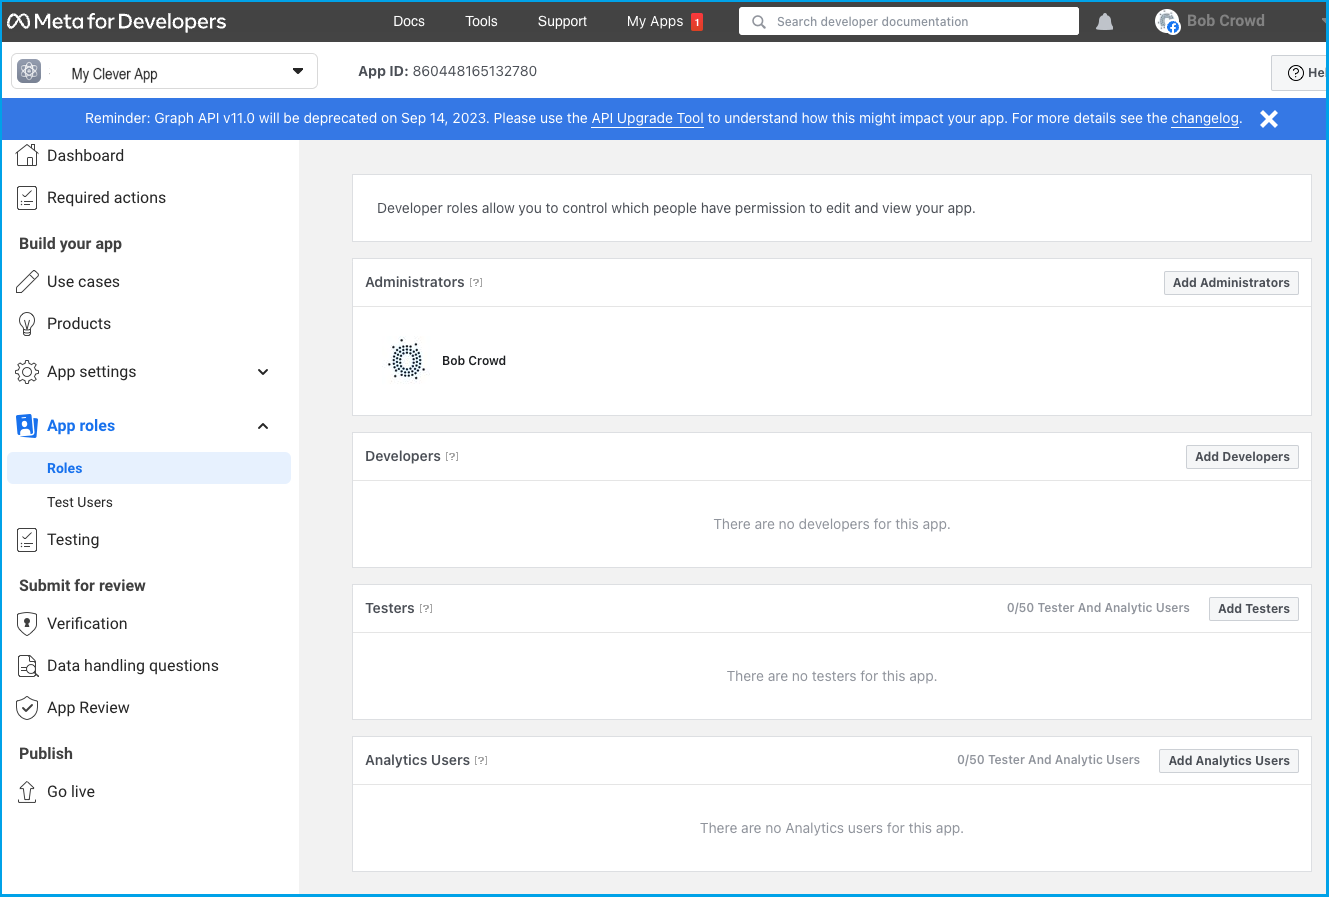
In the menu on the left-hand side, click App roles (indicated 1. in the screenshot below) and in the sub-menu beneath that, select Roles to access the roles and permissions screen. In the main edit panel, click Add administrators on the right-hand side (indicated 2. in the screenshot below).

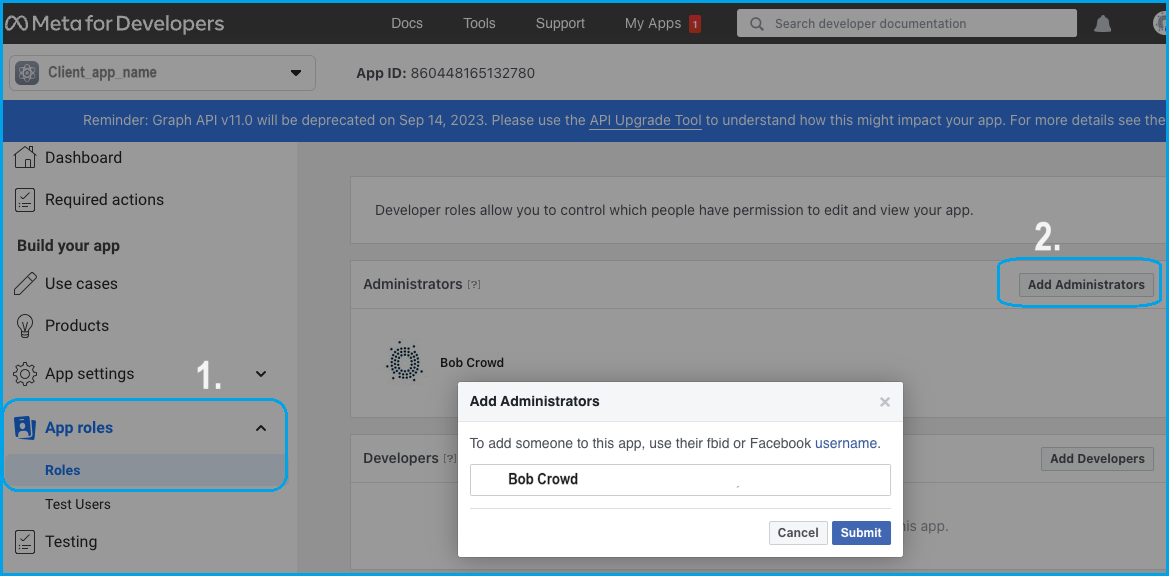
A pop-up presents the interface to add an email address for a new administrator.
Enter the Cortex Facebook account username Bob Crowd. This will allow Cortex administrators to make necessary changes to the app.
Click Submit.
- This will return you to the app edit page.
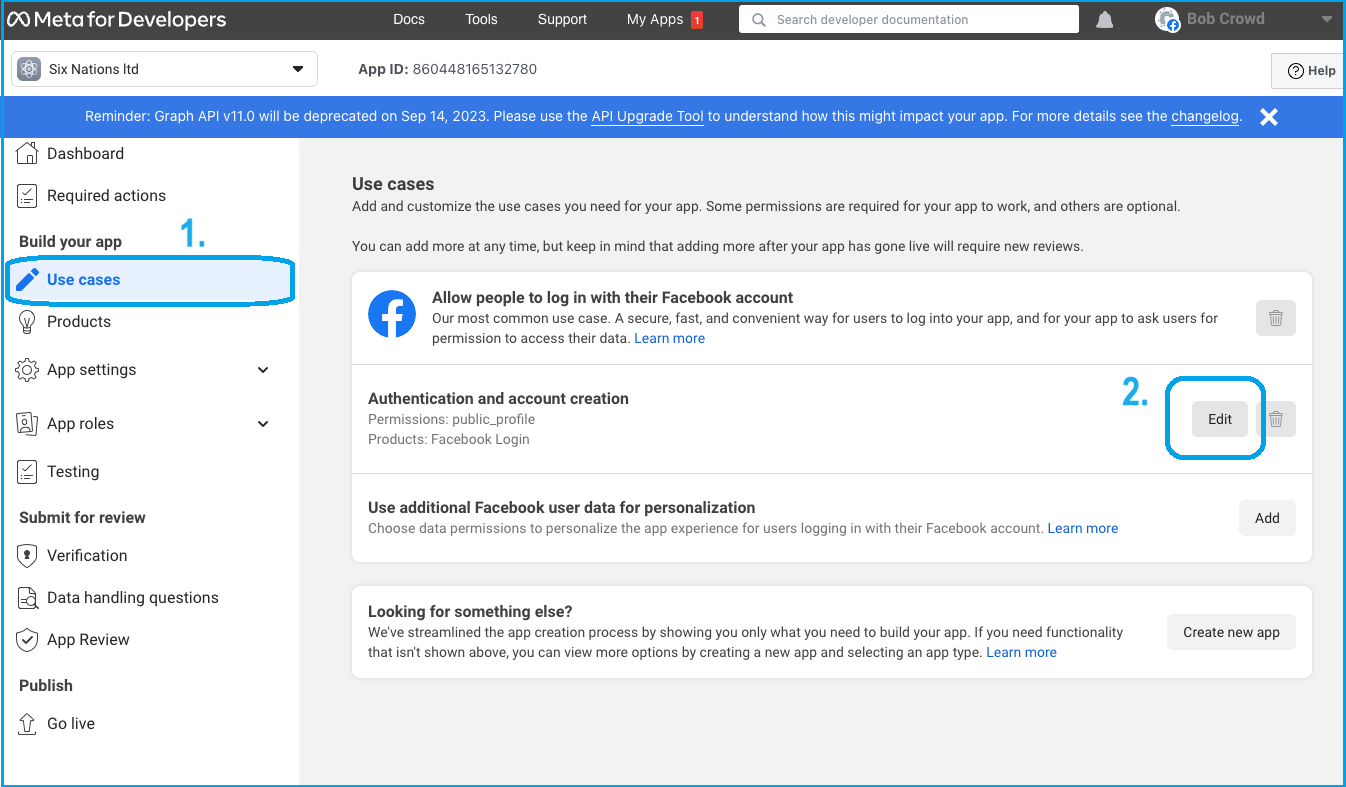
On the left-hand menu, click Use cases (numbered 1., above), then in the central panel select Edit (number 2. Note this button may be entitled Customize if you have edited anything already) and add Email to the use case permissions. This allows the app to read a users primary email address.

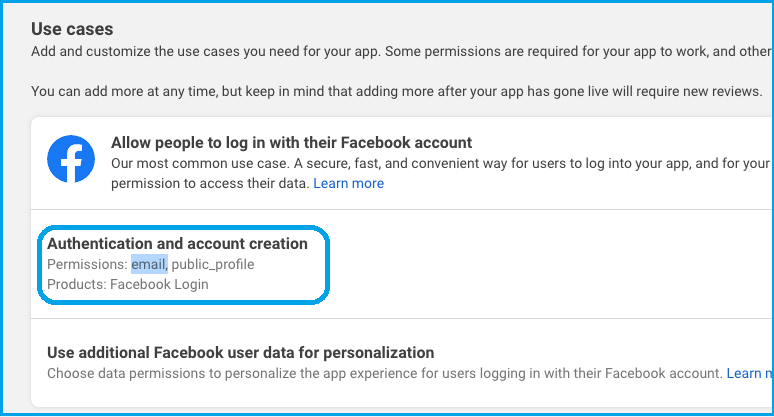
Once an email is successfully added, it will show as part of the Authentication listing on the App edit page, like this:
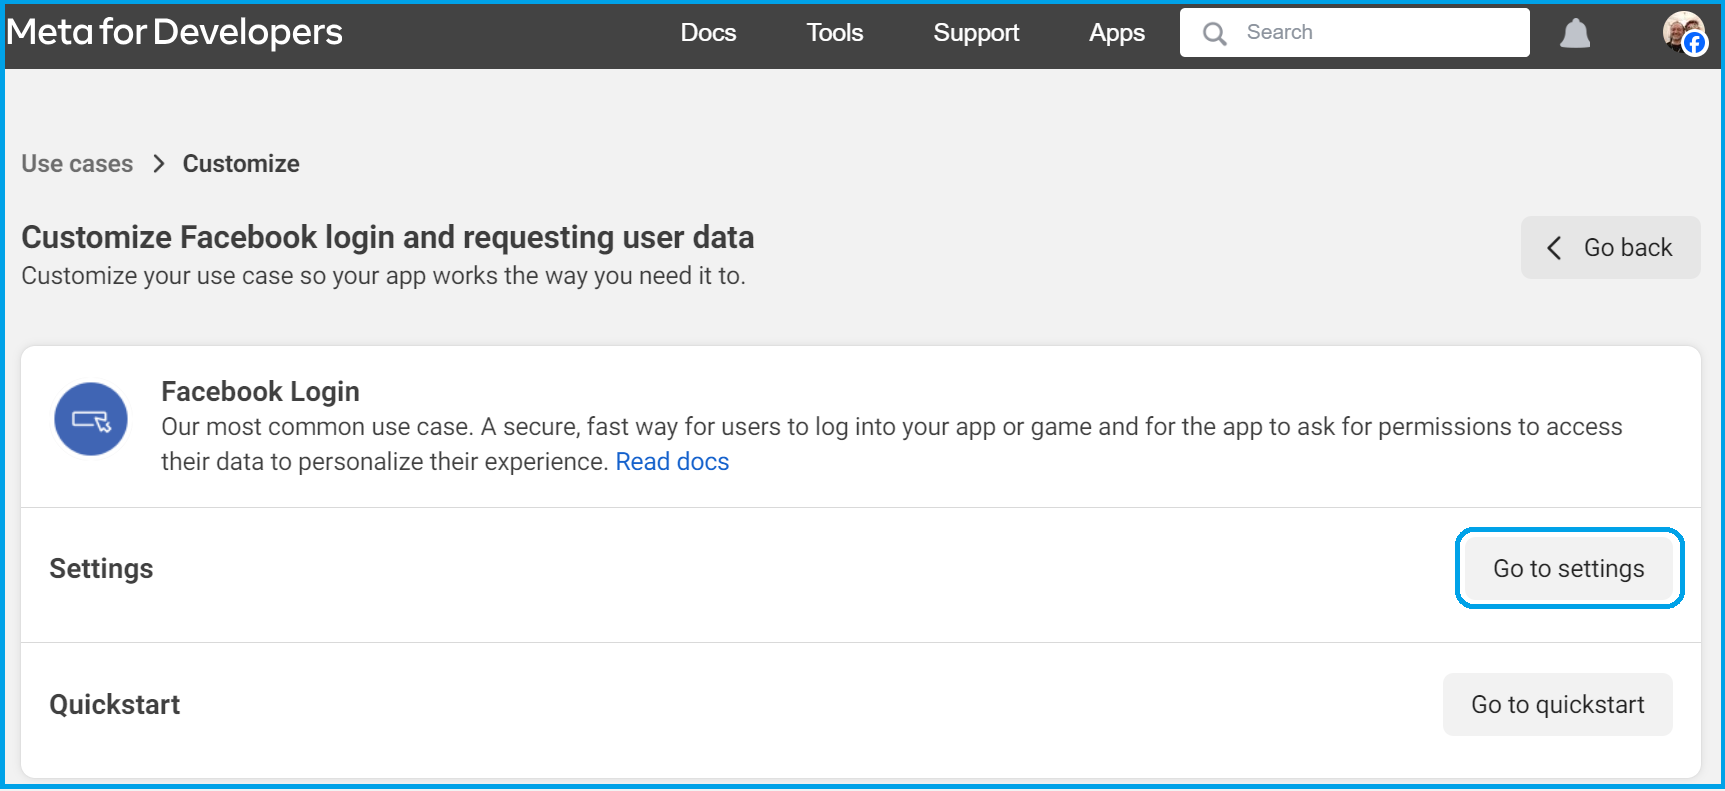
- Using the left-hand menu, return again to the Use cases page, and in the central panel select Edit (Note this button may be entitled Customize), just as you did in step 7, above.
Within the Customize window, click Go to settings on the right-hand side.
This will open the Facebook login settings interface. (In the screenshot below, we have scrolled down a little.)
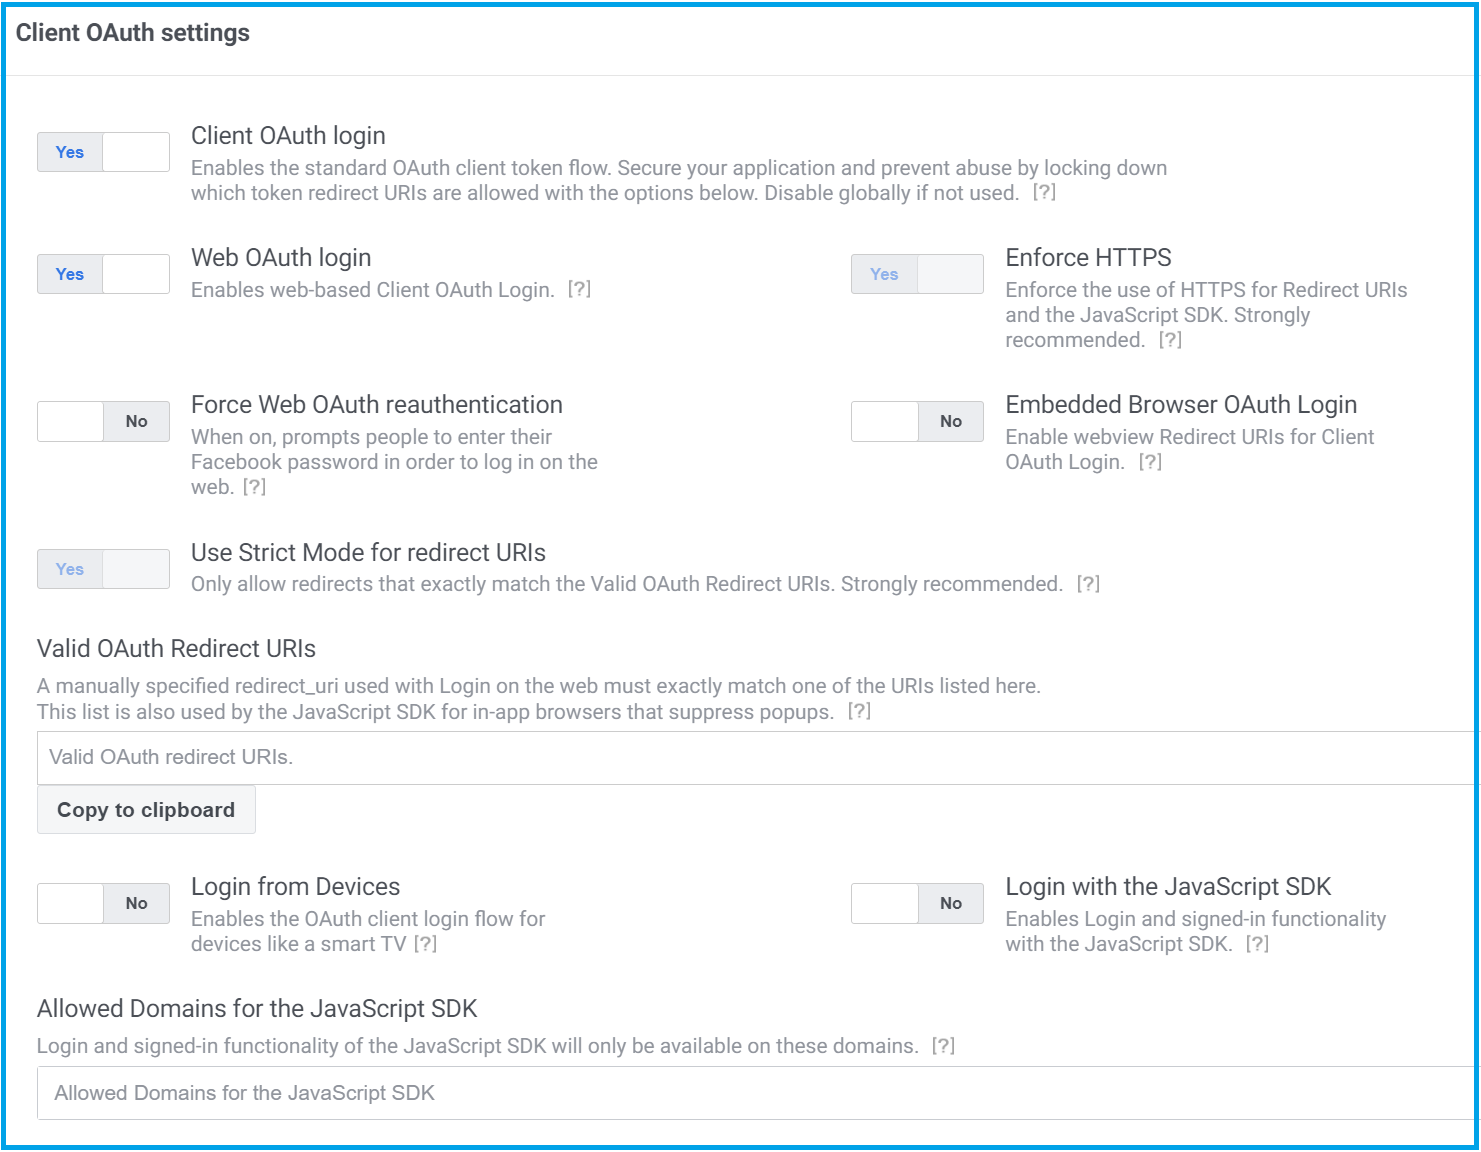
In the field for Allowed domains for the JavaScript SDK, add the domains for which the login is to be used, including any internal or test domains, such as localhost or login.theClientWebsite.com
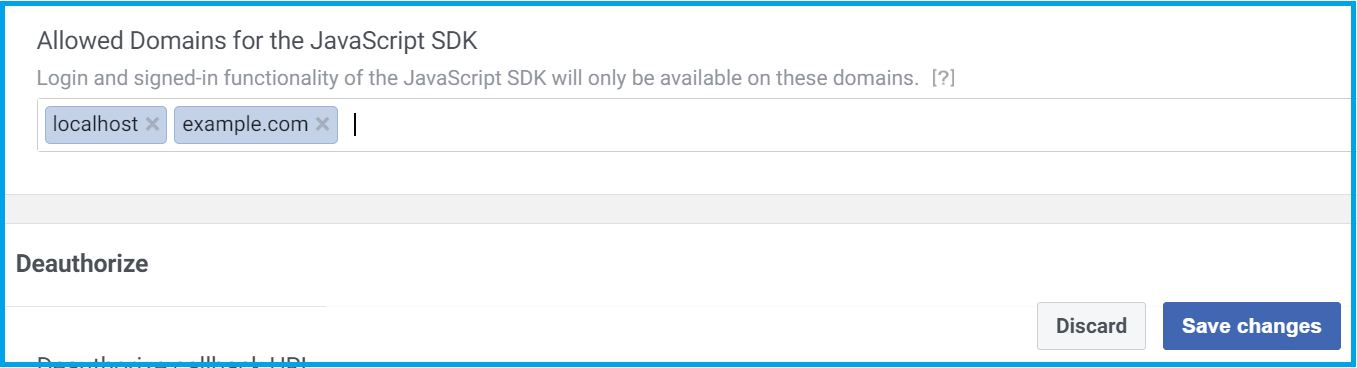

Click Save changes.
- Now return to the top of the page and click the Quickstart guide.
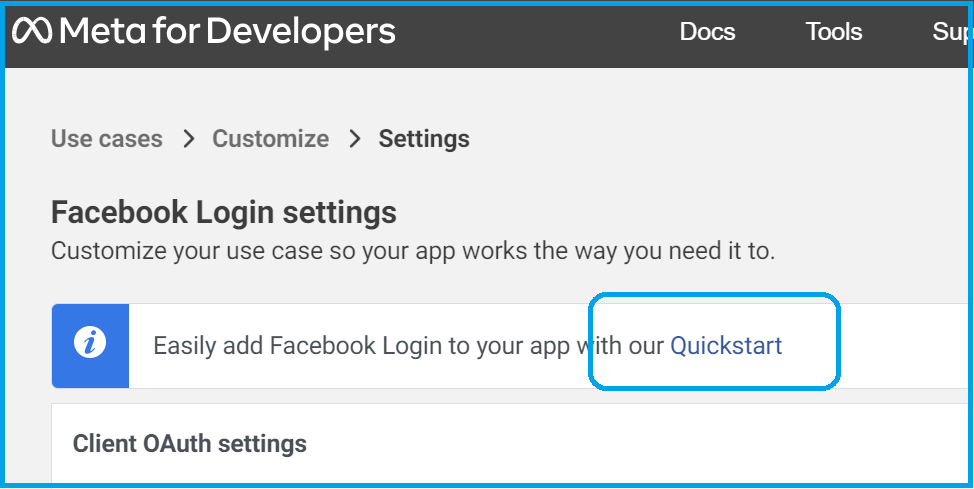

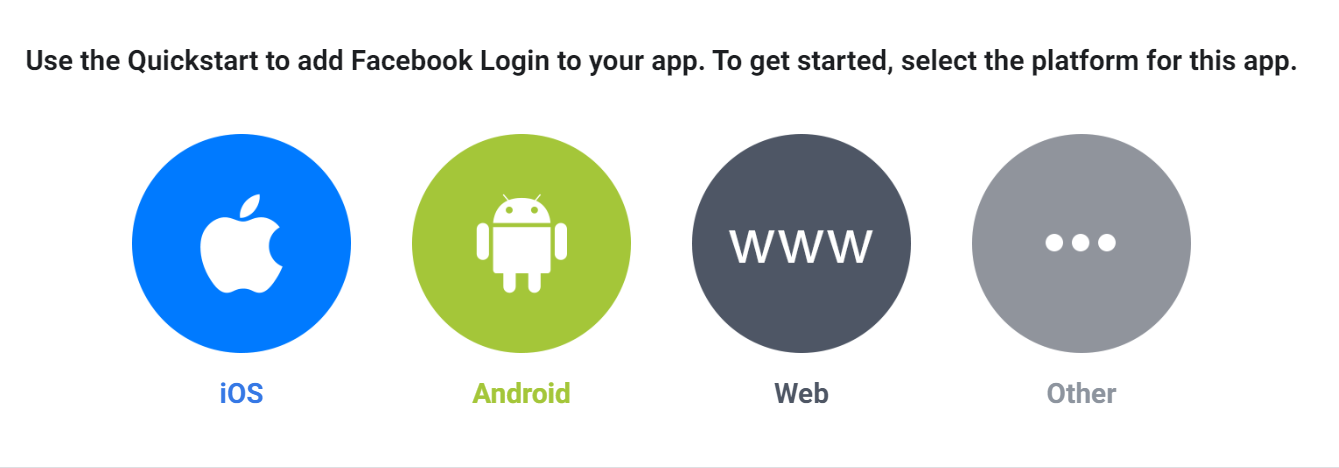
The Facebook Login Quickstart guide will open.
- Select the Web tab.

- You are invited to provide details about your website. Enter your site URL and click Save, then click Continue.
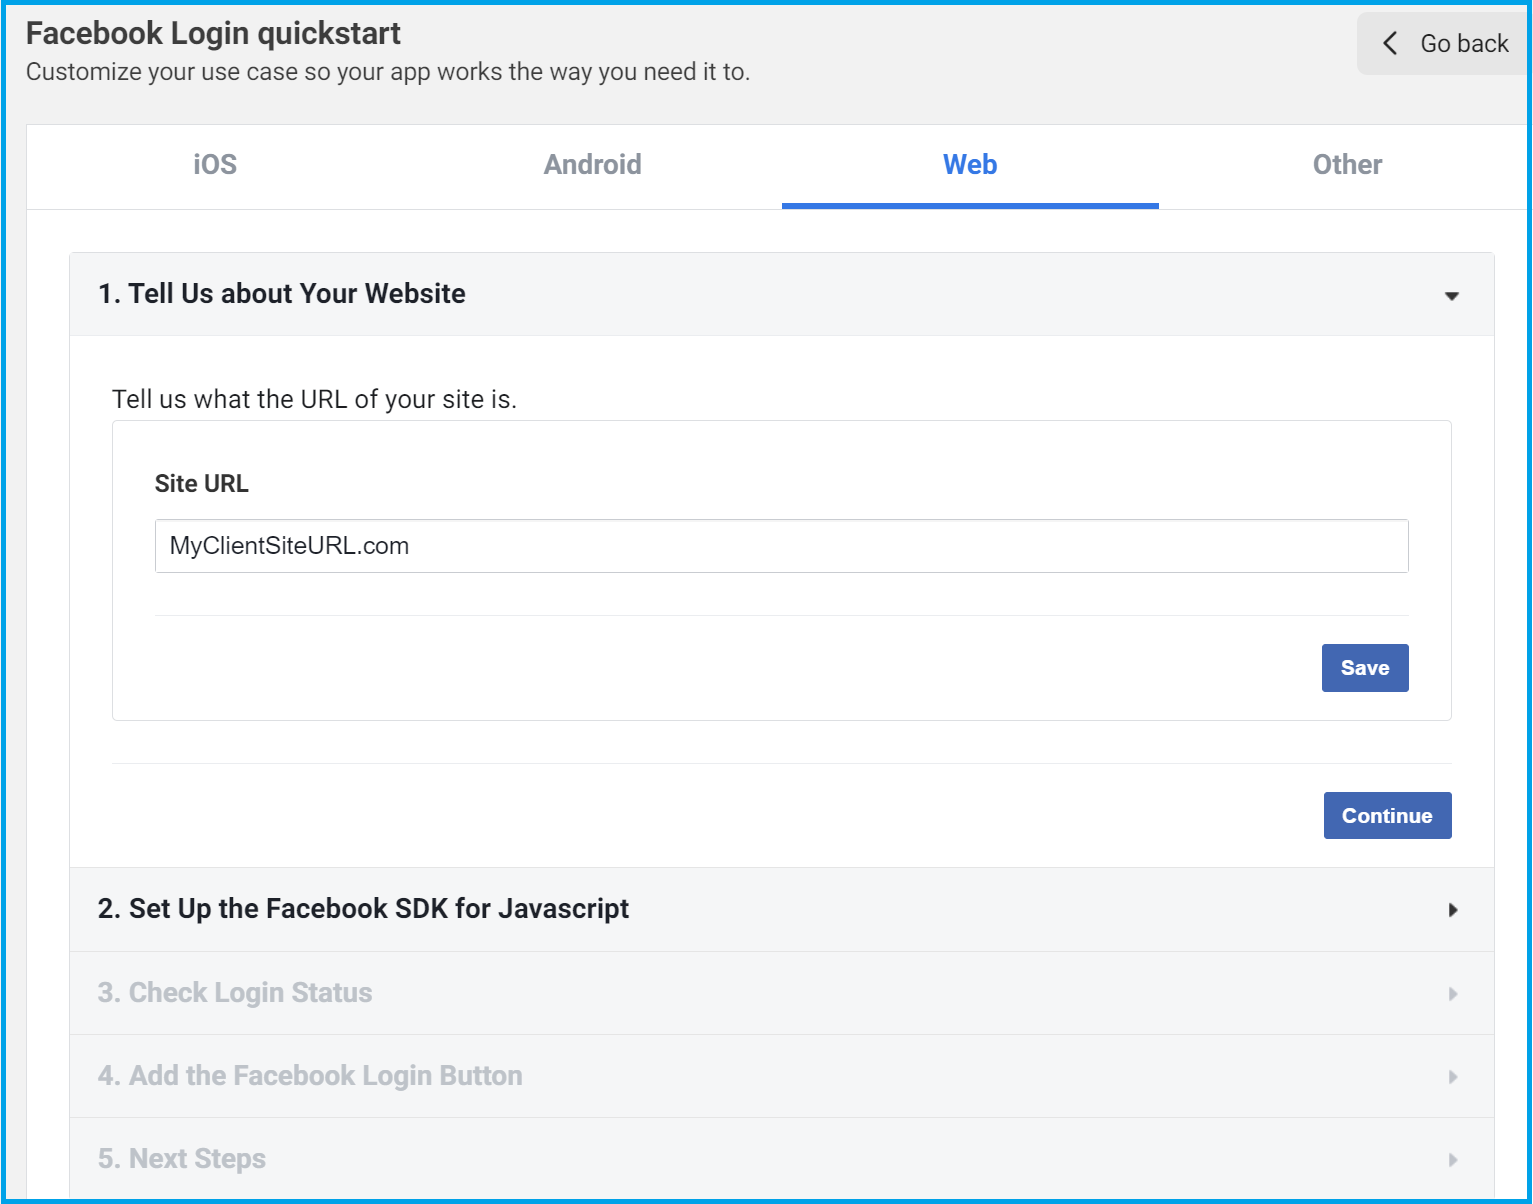

The Setup the Facebook SDK for Javascript interface is presented.

- Click the Copy Code button. As you can see, this code can be embedded into your HTML at the appropriate location to add the Login with Facebook button to your website.
There are two values that need to be entered into the code. Do not fetch them yet, as we need to complete these screens first, however, do note that they are:
- The
App ID, which can be seen in the URL bar, as highlighted here:

It can also be found at the top of the developer portal (highlighted in the next screenshot, below).
- The
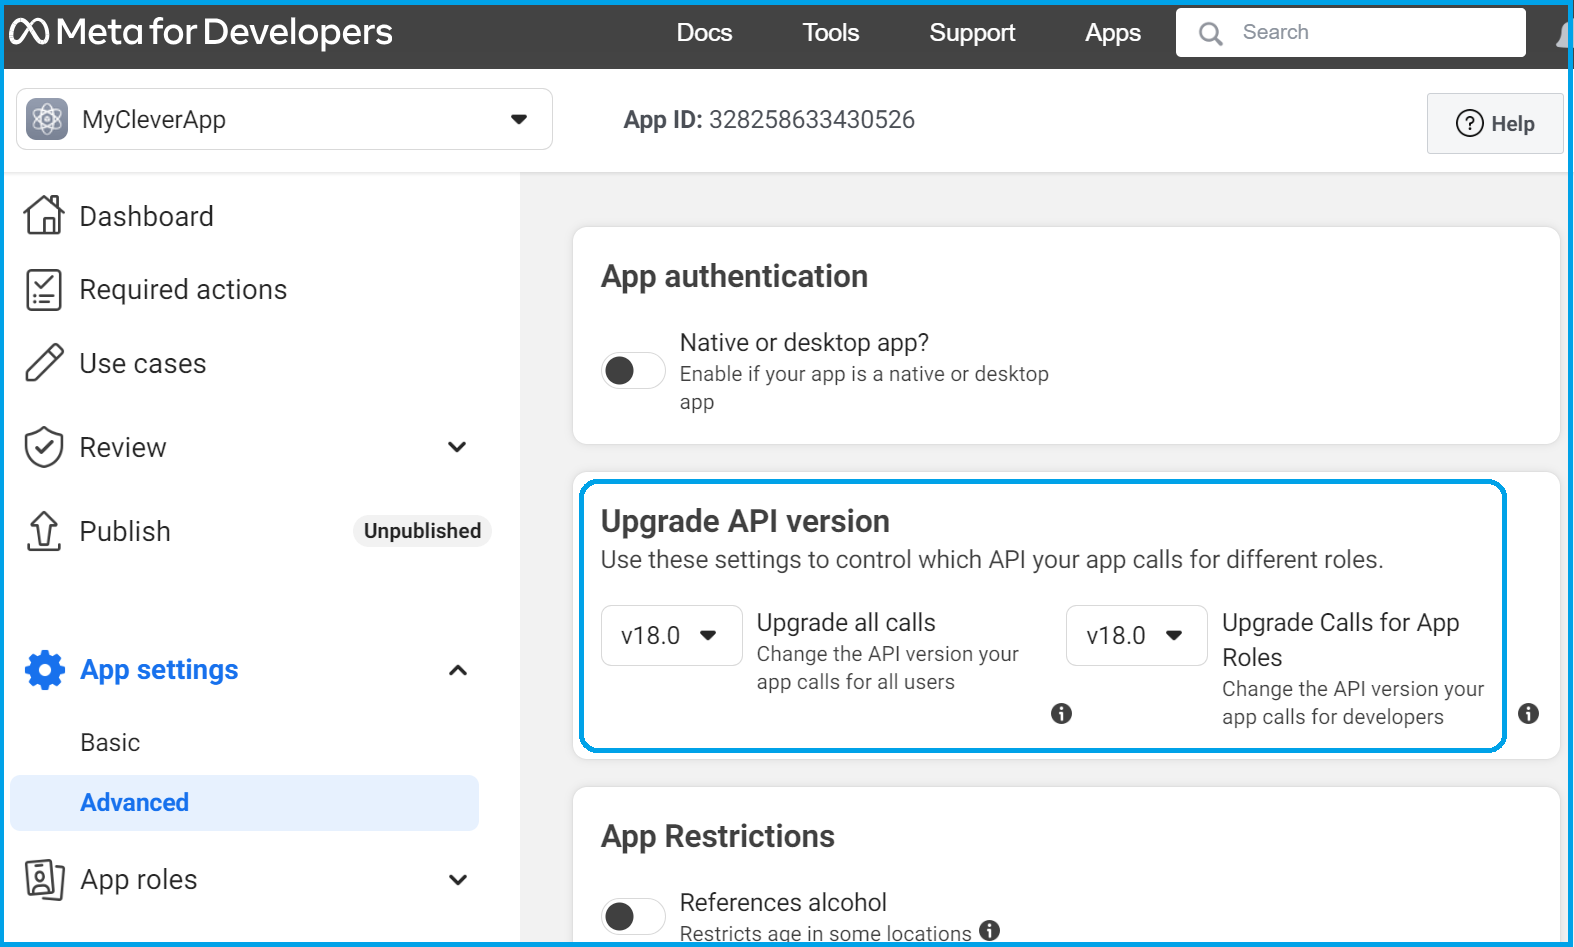
versionfor the API calls, which can be found by clicking App settings in the left-hand menu, and selecting Advanced.
Note that we will need this information later. For the moment, click Next and move on to section 3 of the App create page to: Check login status.
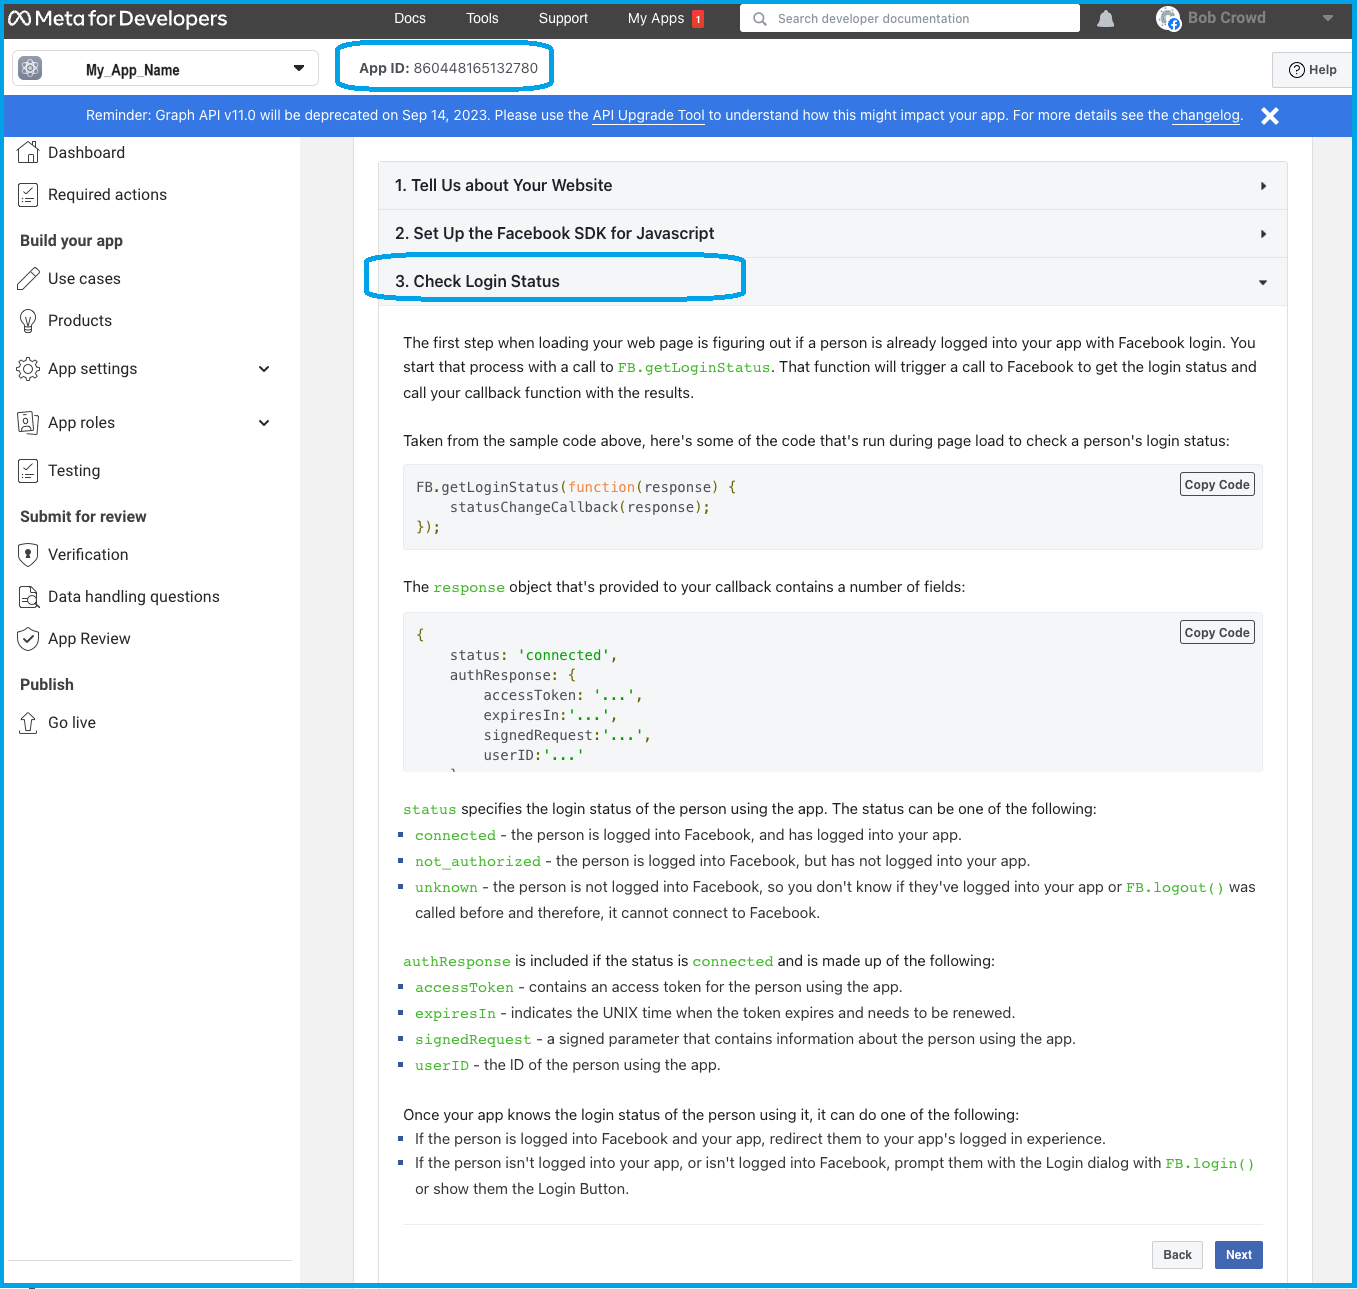

As you can see, this section is about understanding the login status of the user accessing your website.
The page gives you the information you need concerning the API call to make, and interpreting the responses. Ultimately, once your app knows the login status of the user, if they are logged in to Facebook and your app, you can redirect them to their user experience; if they are not logged into your app, you can send them to the login prompt.
- Click Next and move on to section 4, Add the Facebook login button.
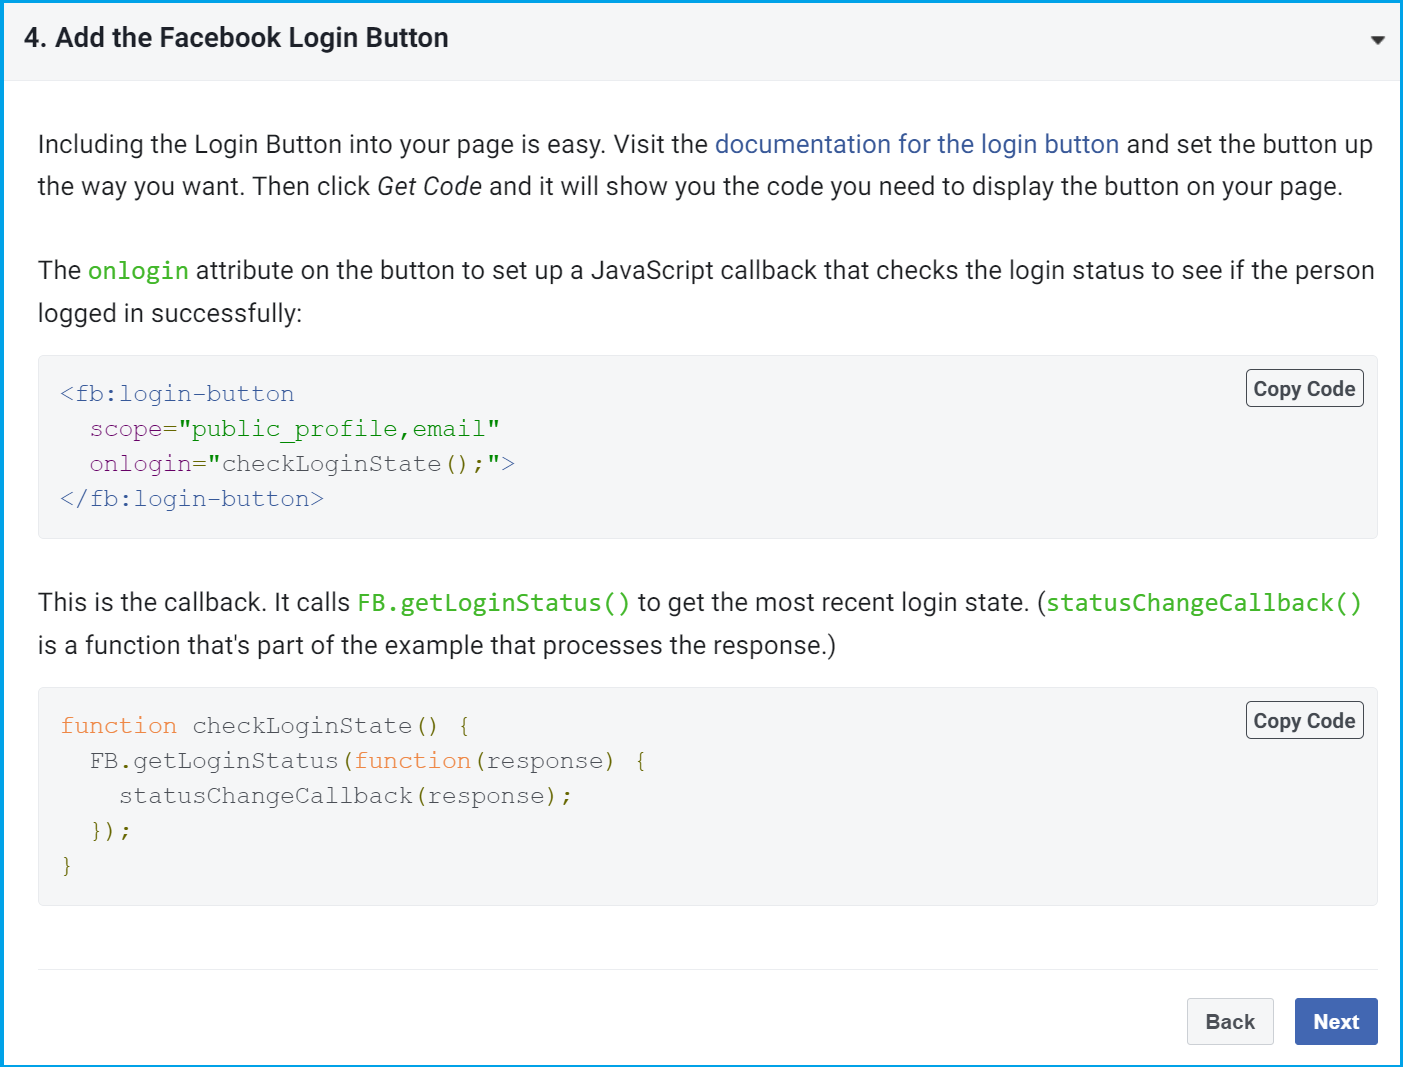
Follow the instructions for checking the login status and processing the callback.
- Note that you cannot yet submit the app for review because Facebook needs to see test data before they will accept an app for review.
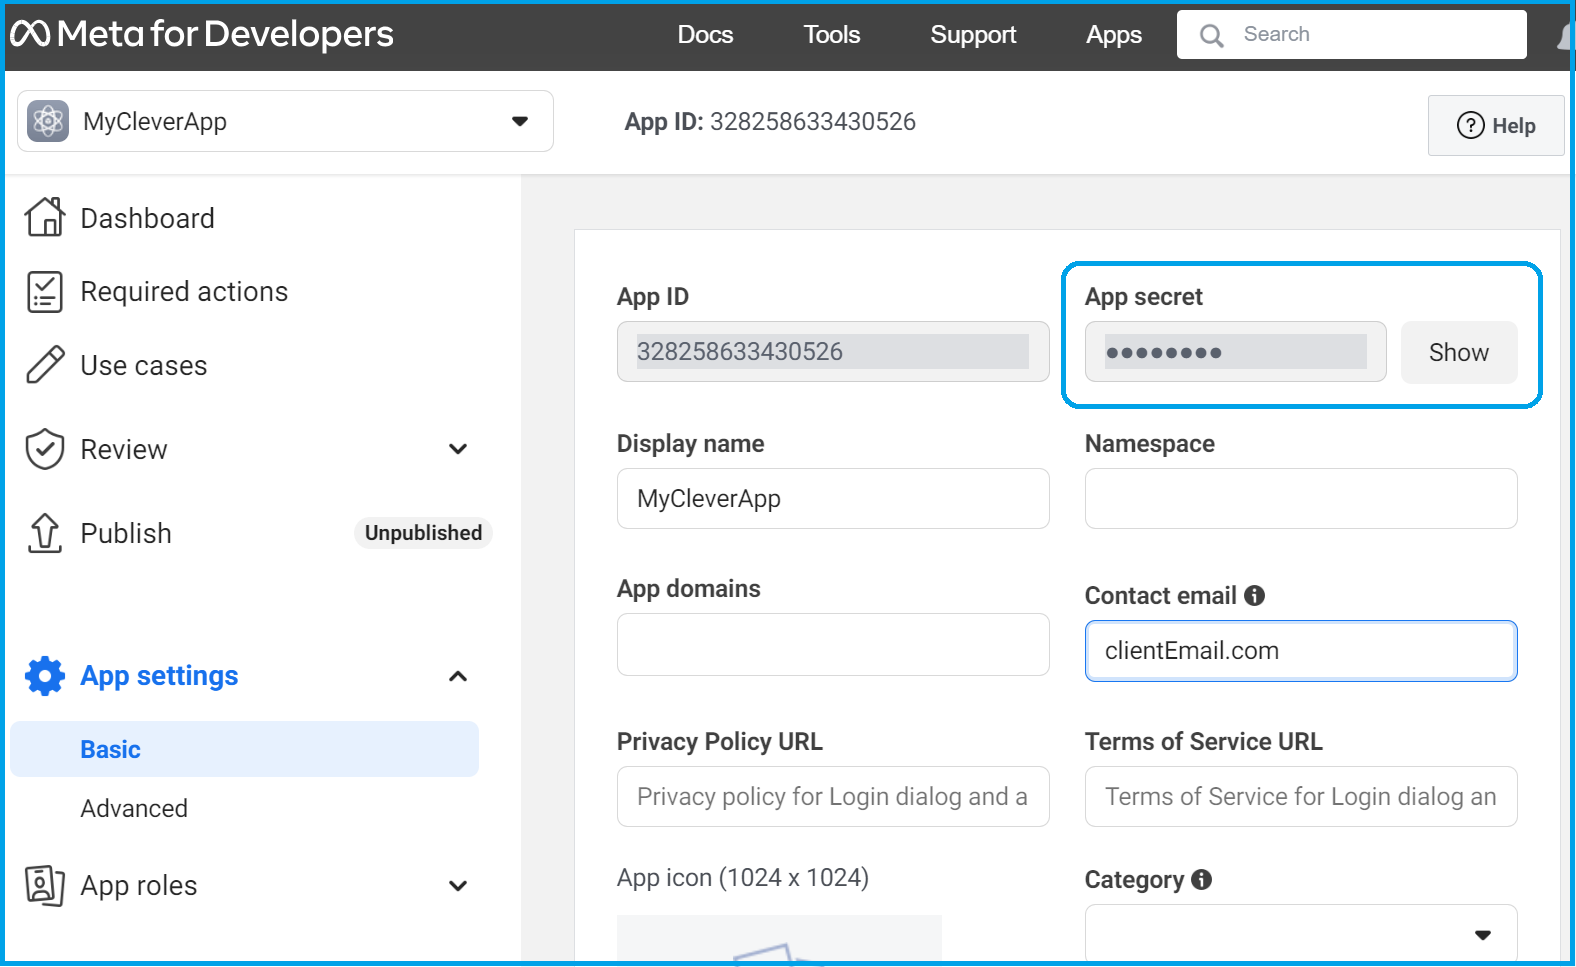
Before we move on to test and publication, the backend team need to be provided with:
- The API Version
- The App Secret Key
These can be found under App settings in the left-hand menu. Select Basic settings to find the App secret.

And click Advanced settings to find the API version.

Alternative options
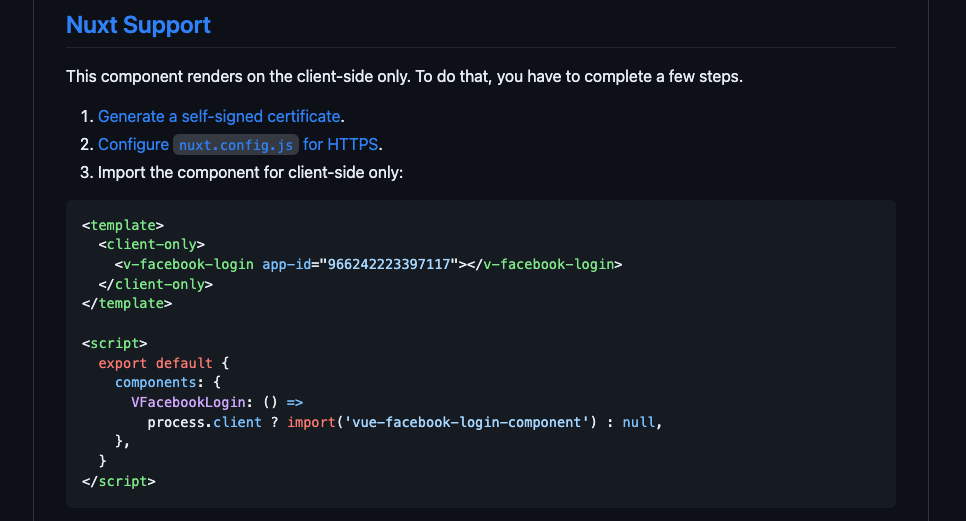
A Facebook login script can also be composed using a VueJS plugin (compatible with vue2 and vue3) which can be found at https://github.com/adi518/vue-facebook-login
It also has specific support for Nuxt https://github.com/adi518/vue-facebook-login#nuxt-support

Another plugin that may also be used is here: https://github.com/iliran11/facebook-login-vue/. This one works as a proof of concept in the Cortex Login Microsite.
WARNING
Note that this library is old and the cookie parameters should be changed to false. (https://github.com/iliran11/facebook-login-vue/blob/master/src/helpers.js#L10C7-L10C21) along with changes to other parameters.
Further reading can also be found here:https://developers.facebook.com/docs/javascript/reference/FB.init/v18.0
The Facebook internal documentation on this process is here: https://developers.facebook.com/docs/development/create-an-app.
Testing, verification and publish
- To test the app, first ensure all test users have Facebook accounts and are listed as either Administrators, Developers or Testers in the App roles section of the app creation pages.
- Click on Testing in the menu down the left-hand side.
Note
Note that Facebook must see data from the test procedures before they will allow the app to be submitted for review.

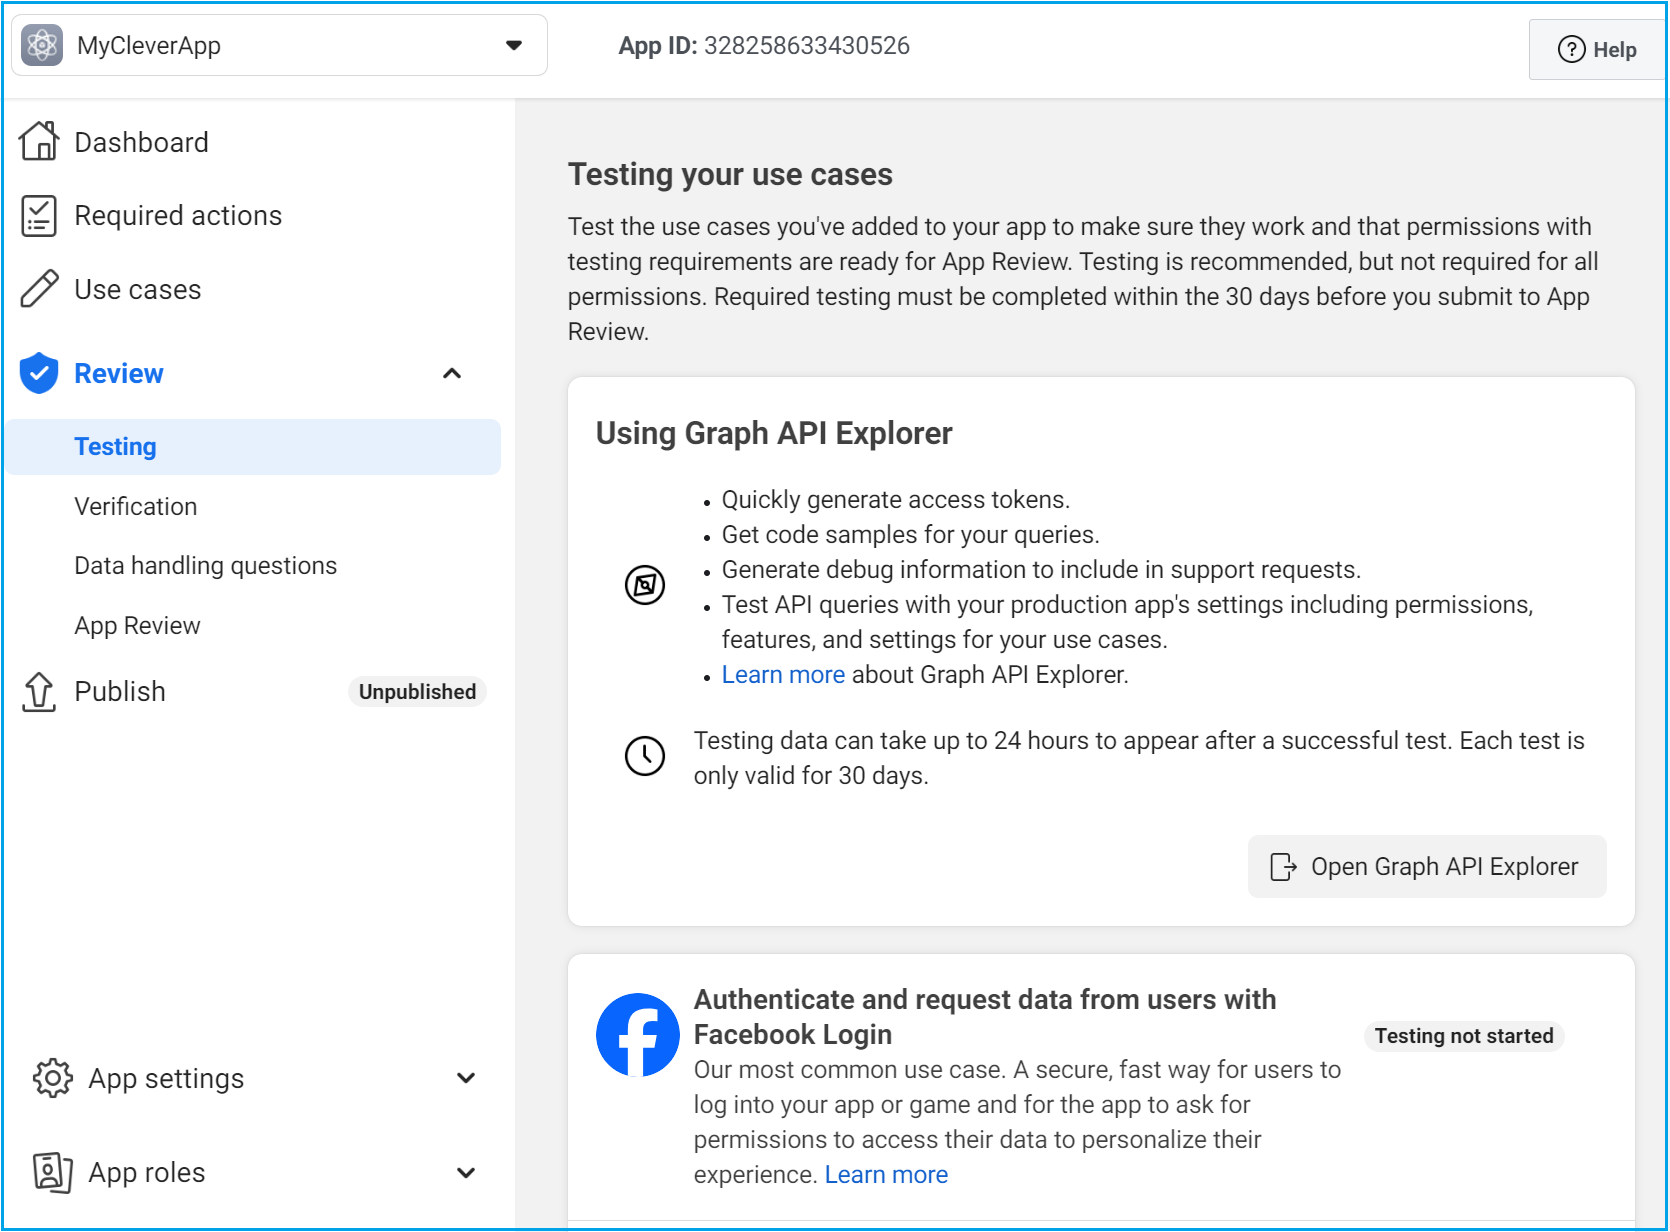
Run through the test process as appropriate to your use cases.
- In the left-hand menu, click the Review option, and then select Verification.
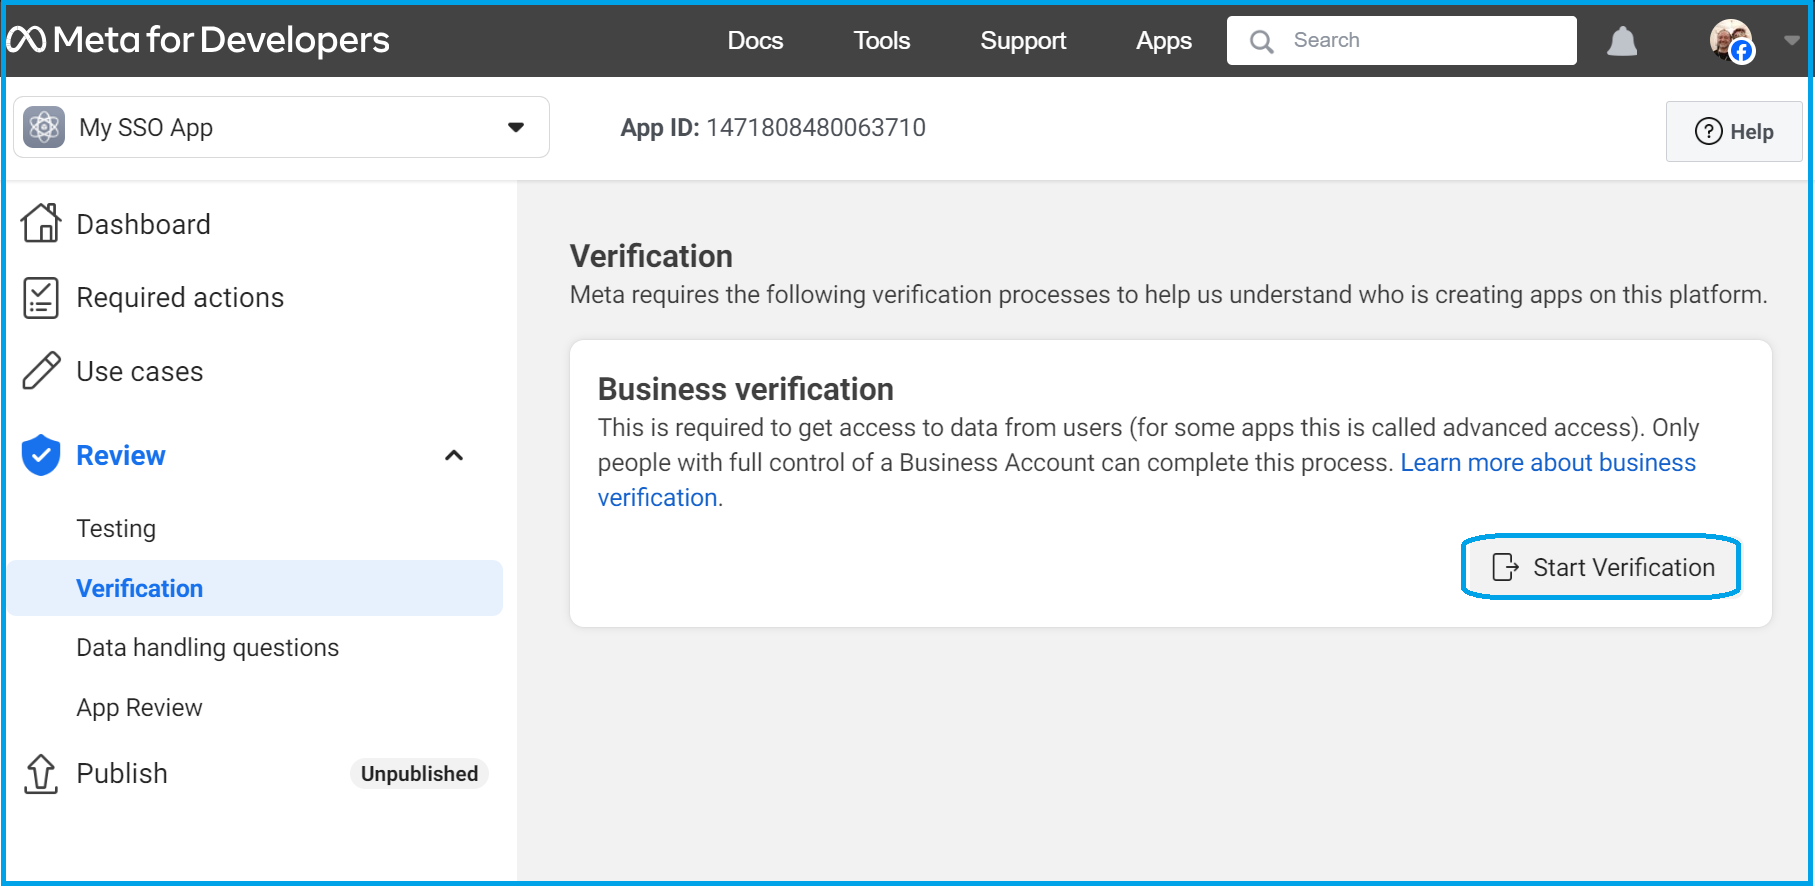

Step through the Verification requirements and Data handling questions.
- Once the testing and verification sections are completed, select App review in the left-hand menu.
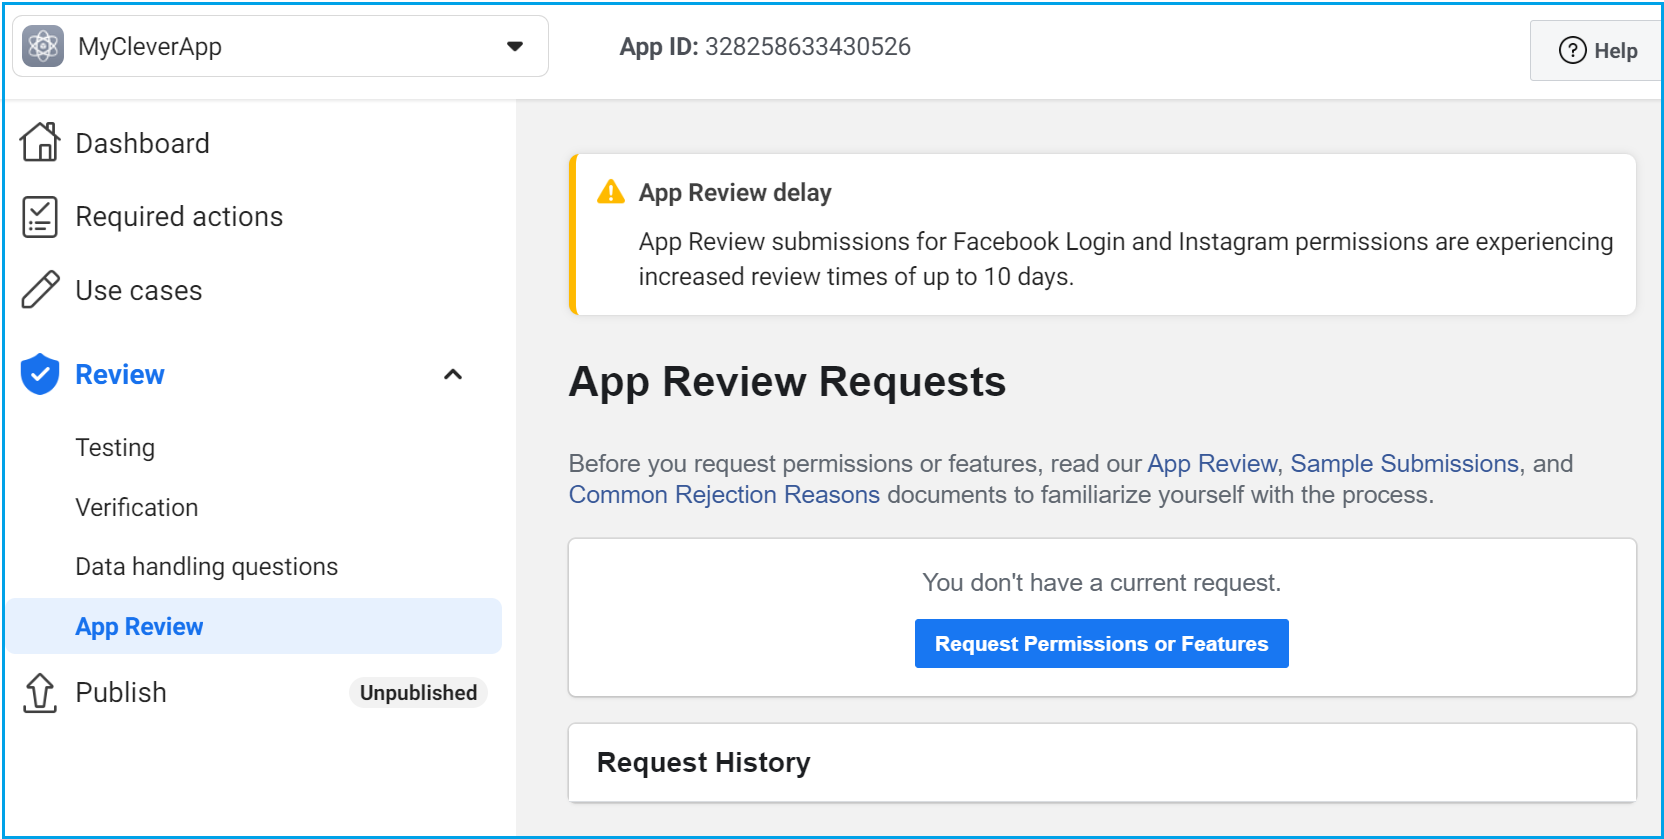

Providing all the test, verification requirements and data handling questions have been successfully completed, the app is now passed over to Facebook. They will complete their internal review process in the next ten days.
- Once your app has passed Facebook review, click Publish in the left-hand menu.
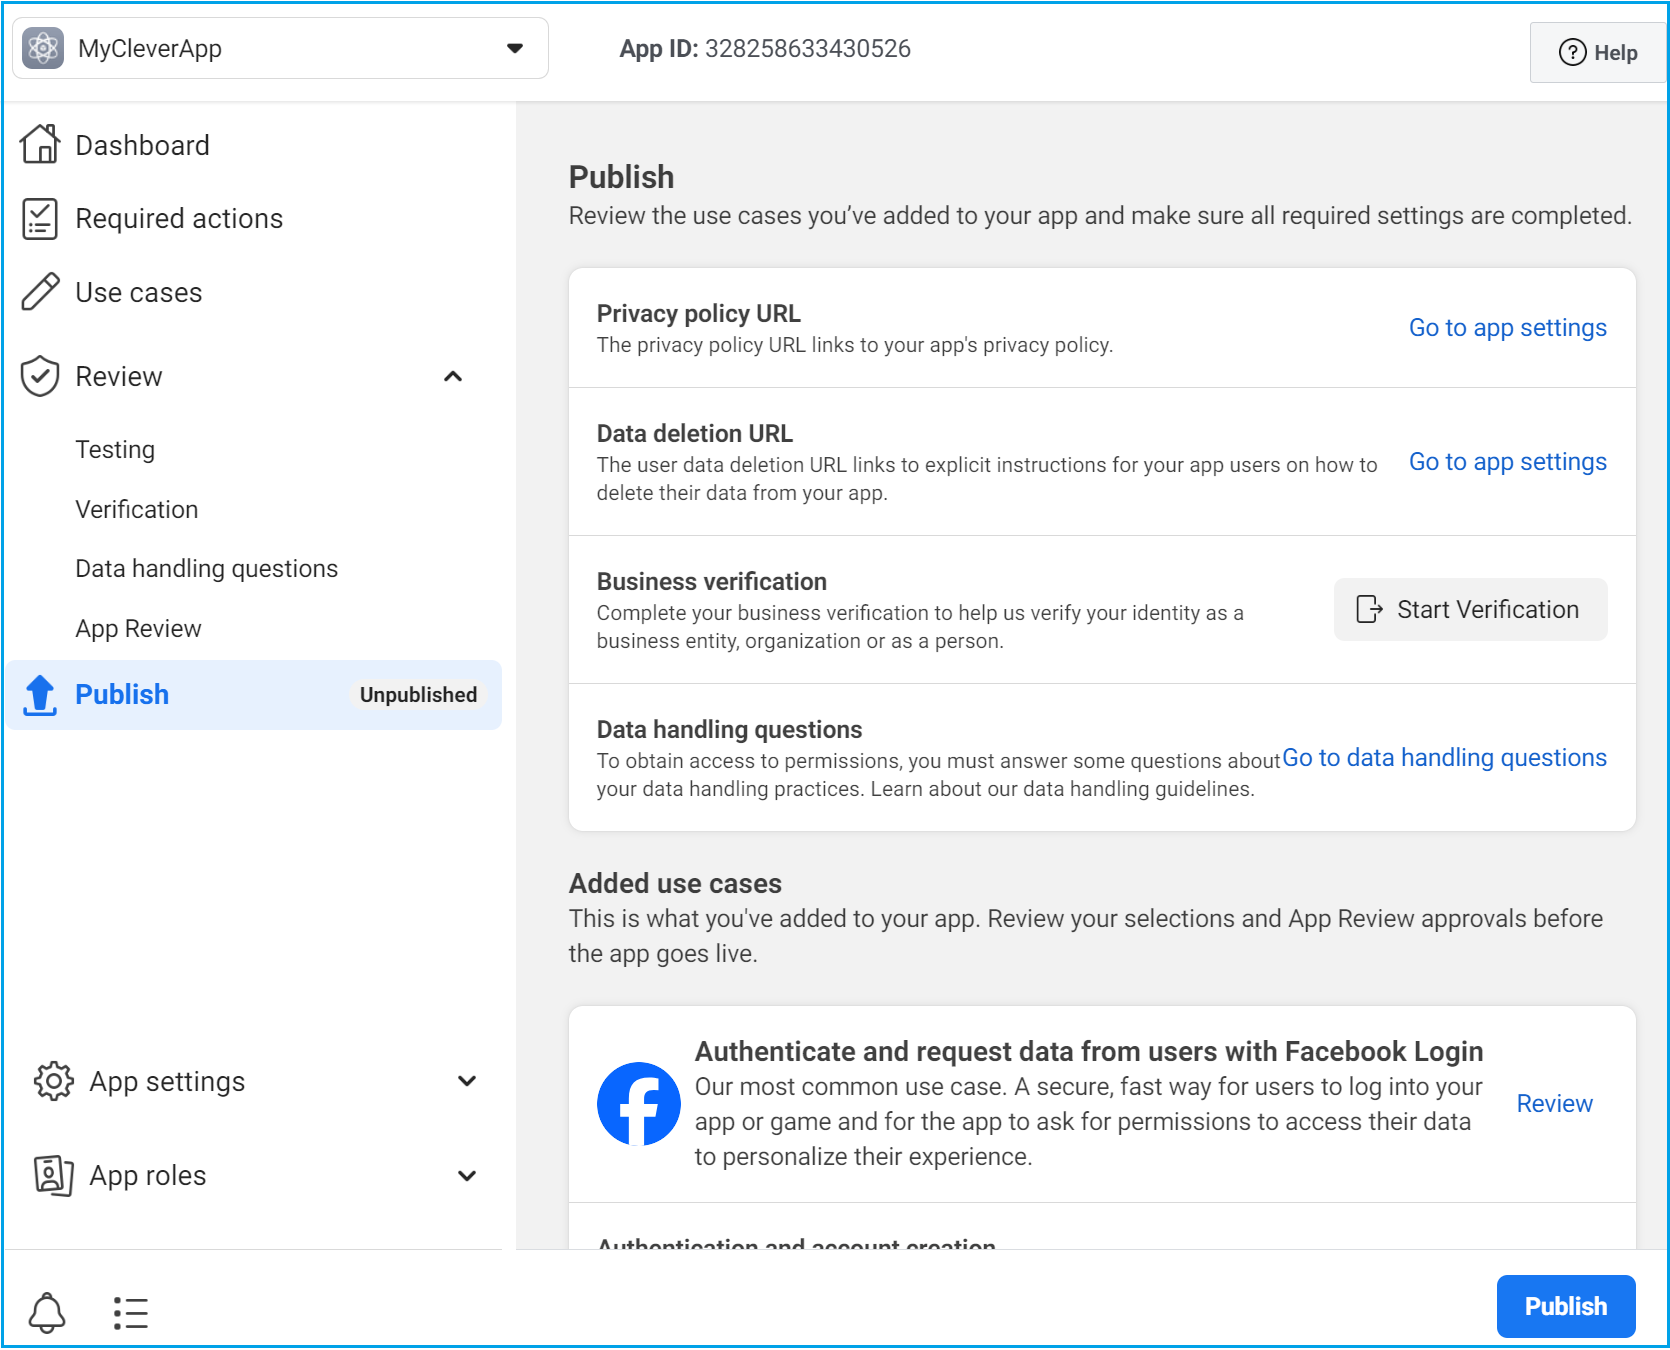
All sections will need to be completed before publishing.
Go live can take up to 10 days and the application may be rejected by Facebook if they are unable to verify any of the information submitted.
Single-sign on using Apple
Apple Developer Docs: Sign in with Apple | Apple Developer Documentation
Javascript Docs: https://developer.apple.com/documentation/sign_in_with_apple/sign_in_with_apple_js
This must be setup on a client owned Apple Account! That means they need to pay $100 per year
First - login to the Clients Apple Account (we need to be added as an administrator by them) and go to Certificates, Identifiers & Profiles - https://developer.apple.com/account/resources/identifiers/list
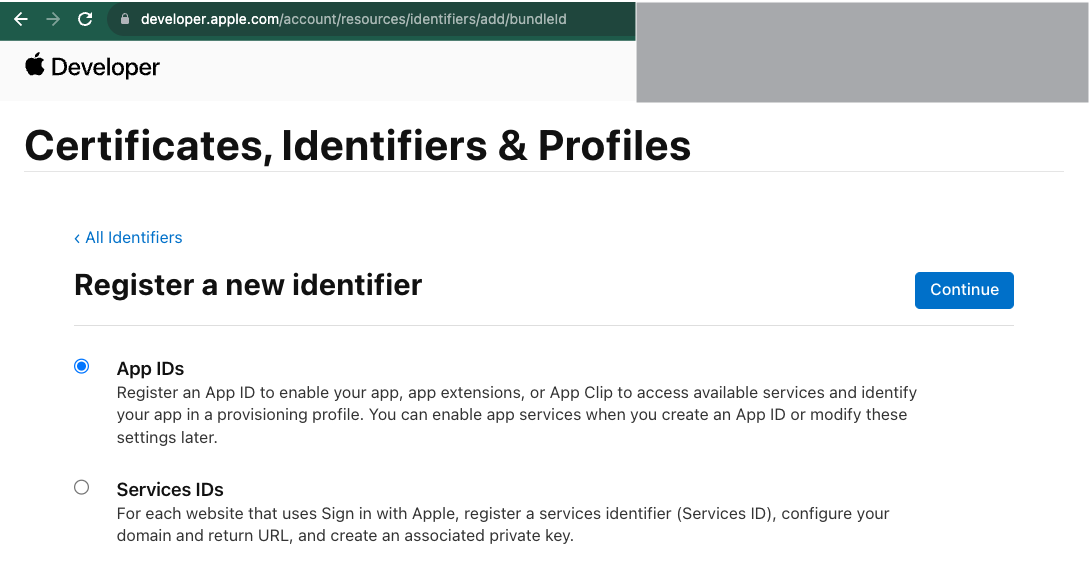
Hit the Plus button to create a new App ID - Select App

Enter the bundle ID - use reverse domain style for the name

Scroll down and enable Sign In with Apple
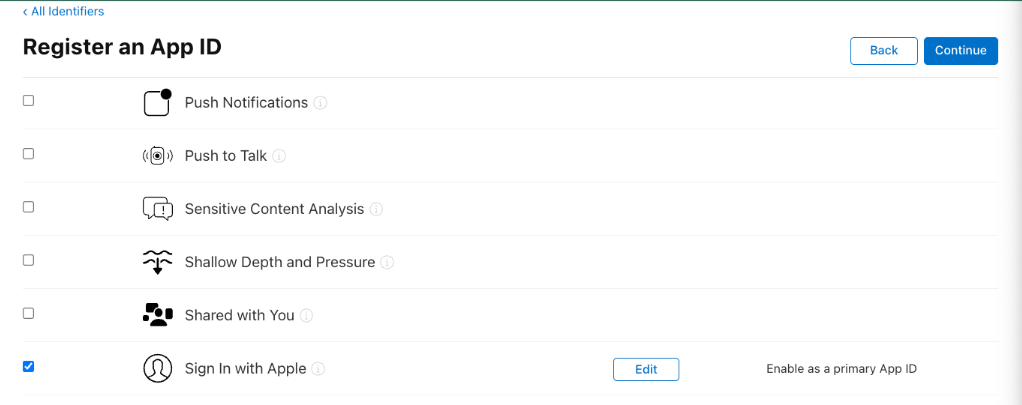
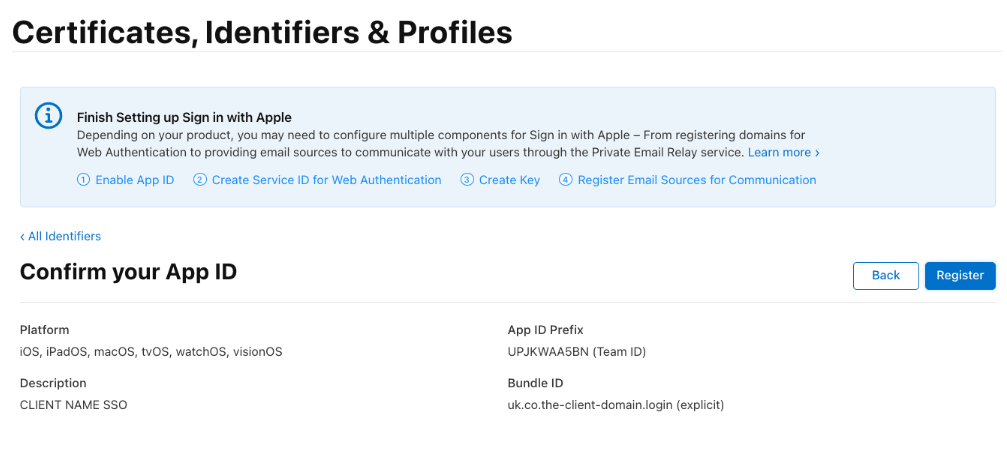
Register it
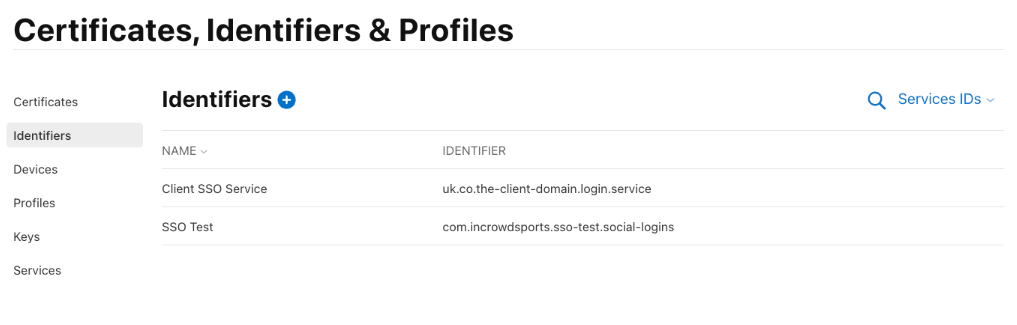
Go back to the list - hit the plus again and create a Service ID
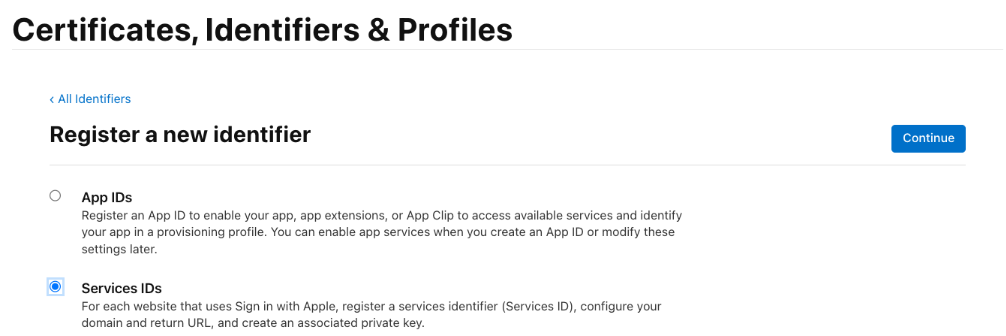
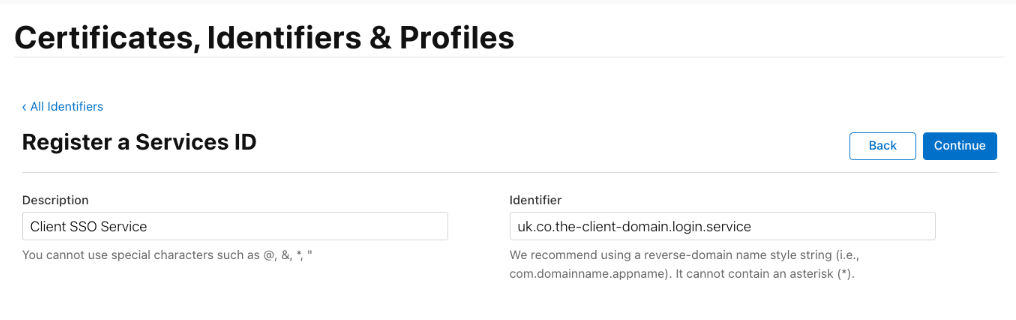
Tick sign in with apple and hit configure
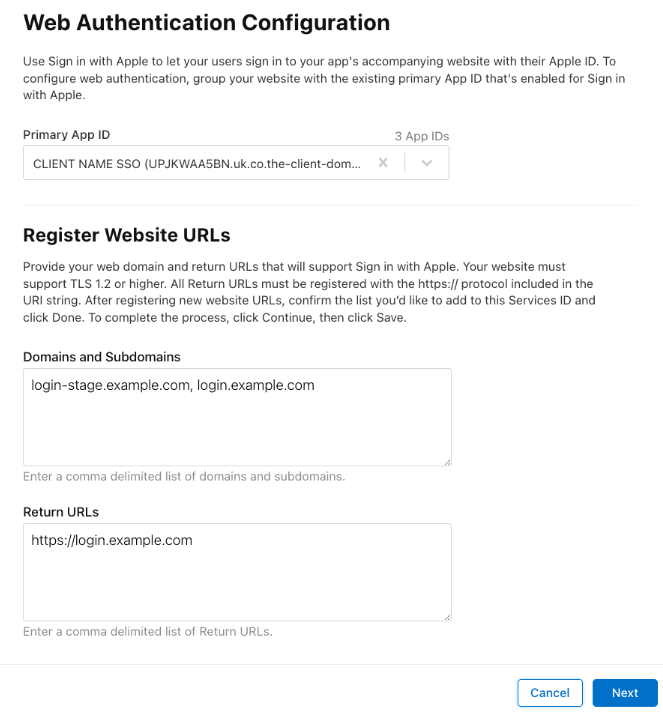
Add all the domains required for testing, stage and production - HTTPS must be used
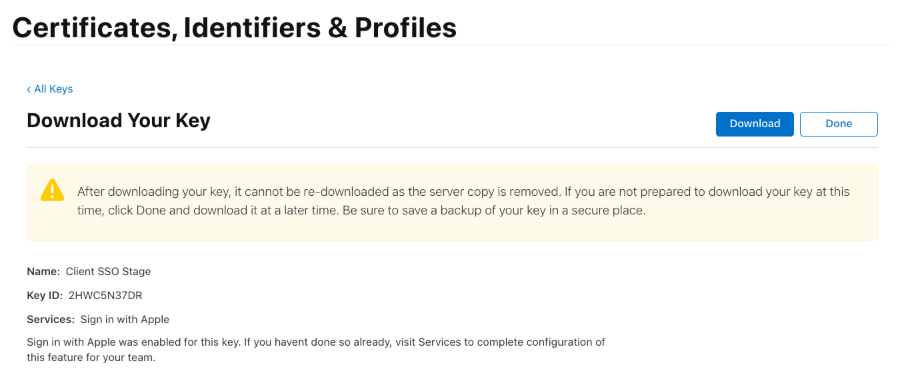
Go to Keys → Create
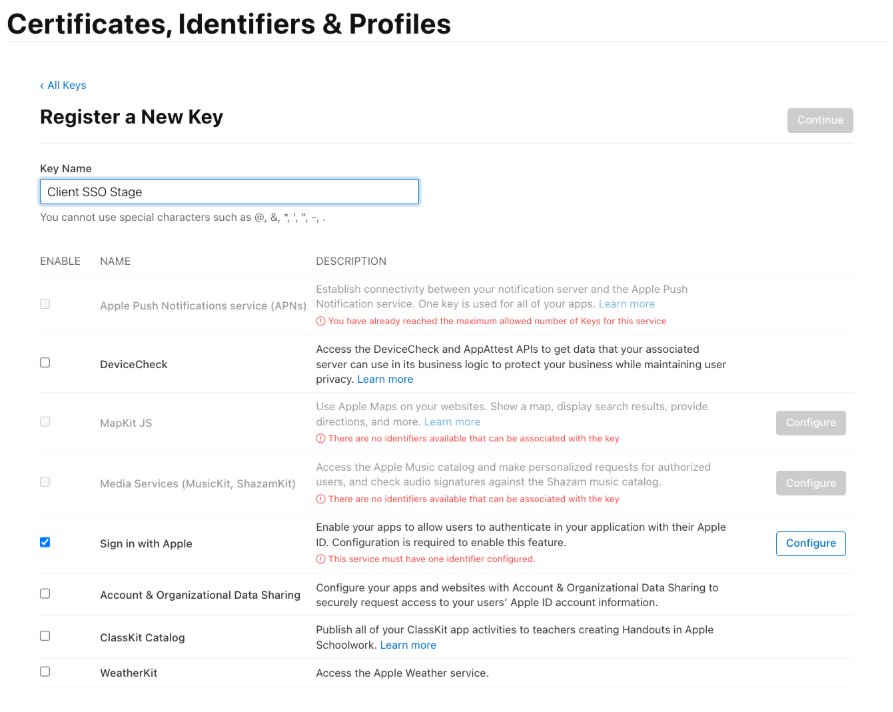
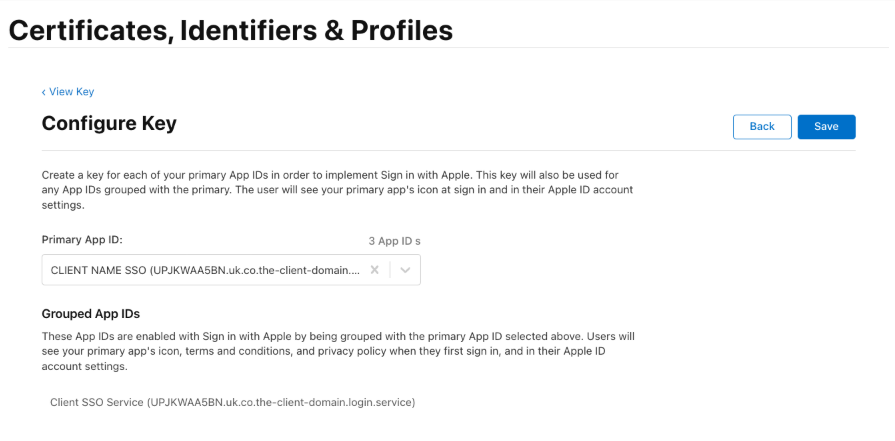
Tick sign in with Apple - and select the primary App ID you already created
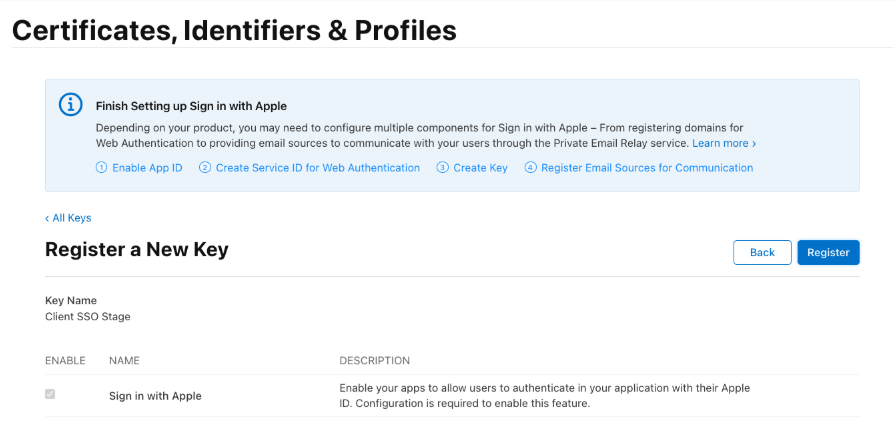
Download the key and SAVE IT SECURITY
You cannot download the key again after hitting download - SAVE IT SECURELY!
Once that is done the frontend and backend will need to be given the client ID which will be the bundle ID we created
Testing and Go Live
For Apple - go live is instant with no review required, nothing special required for testing either
Associated articles
Google for developers: https://developers.google.com/identity/gsi/web/guides/overview
Facebook internal documentation: https://developers.facebook.com/docs/development/create-an-app.
Facebook developer page: https://developers.facebook.com/
Apple Developer Docs: Sign in with Apple | Apple Developer Documentation