Custom content blocks
This article explains how, in addition to the range of pre-defined content blocks available in Cortex, there is provision to create custom content blocks for those occasions when the need is not covered by the regular options.
Introduction
One of the benefits of Cortex is that the most common content requirements you may have for a sports app or website are provisioned by pre-defined content models: sponsors, text, image, video, live blog, poll, and more are available out of the box. However, if you have a requirement that sits outside of these presets, the option of creating a custom content block is also available.
From the developer perspective, creating a custom content block essentially allows you to define the structure of your own JSON response.
Who should use custom content?
Custom content blocks source from the fields and settings entered into Cortex. For that reason, this document presents the tools and methods available in creating a custom content block in Cortex. However, although the block is built within Cortex, it generally requires the expertise of a developer to ensure correct outcomes.
Please do note that custom content blocks will need to be integrated across all your platforms. A custom content block created for the web, for example, will not necessarily display on your app without integration work. Similarly, it may need to be ported to both Android and iOS. Please do plan custom blocks carefully to ensure all eventualities are accounted for.
Creating custom content blocks in Cortex
- Log in to Cortex. On the left-hand side, click Custom Content Blocks
- Here you can select from the custom content blocks already created or click New custom content block to create a new one. You are then presented with the Custom content block edit screen. This example is entitled the Player Profile Custom Content Block.
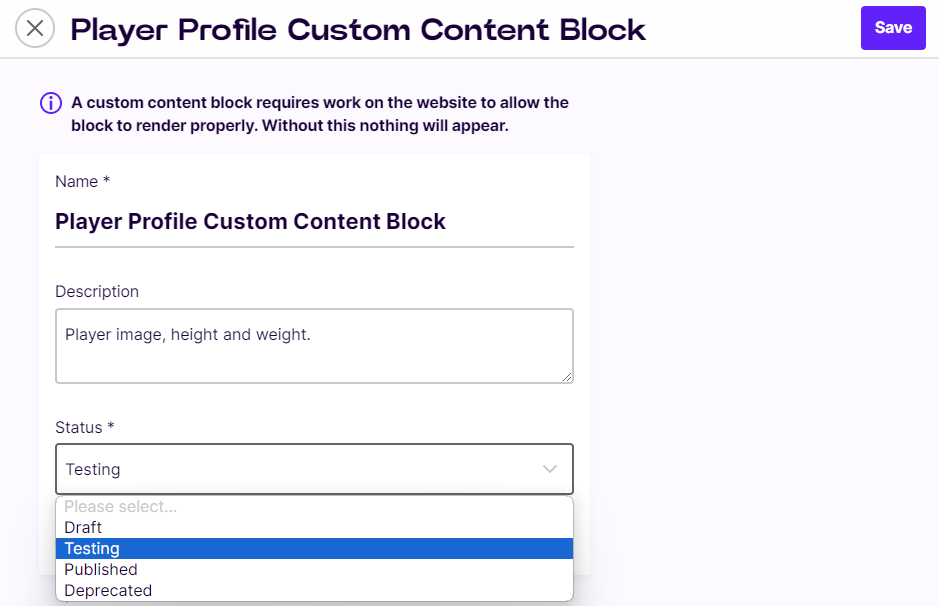
- Give your content block a name and a description, and assign it a Status, noting carefully the meaning of each:
- Draft is the mode in which the block can be edited in the custom content block menu, but not used in any content.
- Published is the mode in which the block can be used in content. Note that edits can continue to be made in the custom content block editor. Doing so will create a new version of the custom content block.
- Deprecated ‘retires’ the block; however, all existing continue that use it will continue to function. It will no longer be offered as a content option when adding a new block, but existing instances of the block will be unaffected.
- There is also a toggle switch entitled Nested only. All custom content blocks can be nested within other custom blocks. However, toggling Nested only to On means this content block can ONLY be used as a nested block. It can not be used as a standalone block.
- Give the custom content block a Key. This can be used by your front end platform to identify the block type, when the block has been used in content. It's also possible to use the block ID, but the key if you have multiple environments - the ID will be unique in each environment, whereas the key could reuse the same value.
- You can now begin to customise your content block by adding fields. To do this, click Insert field at the bottom of the Custom content block edit screen.
- You are invited to select your field type from a list:
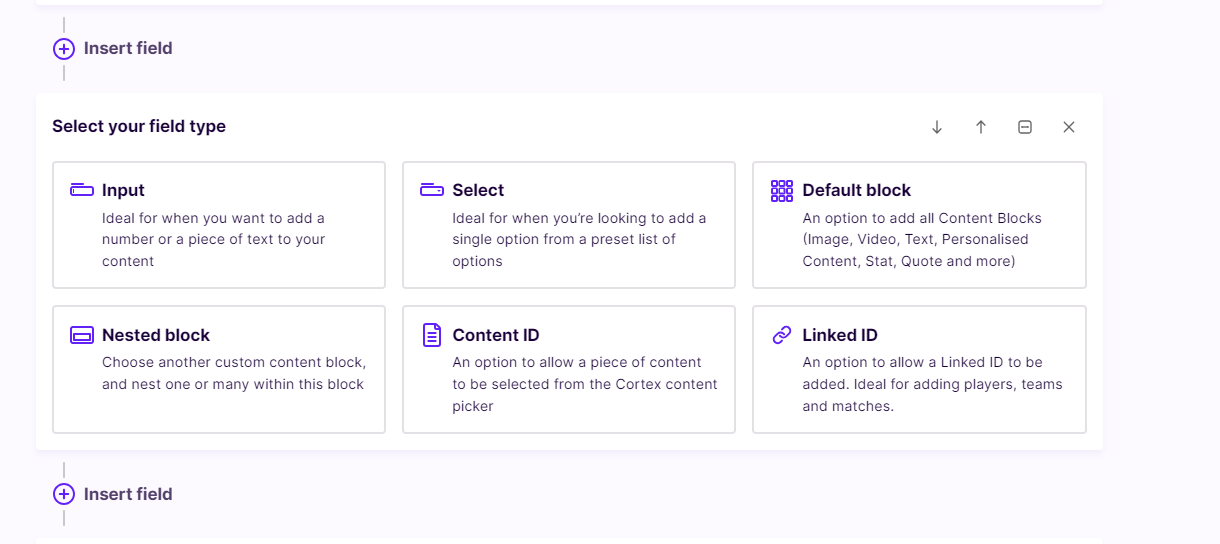
The available fields are as follows:
- The Input field allows the user to insert free text or a numeric value into a field.
- The Select field creates a list of options from which the user can choose.
- The Default block allows you to select from all the existing standard blocks available in the orthodox content creation process; image, text, video, poll, live blog and so on.
- A Nested block is the option to introduce an existing custom content block from those already created.
- The Content ID field allows the selection of an item of content, identified by it’s ID.
- The Linked ID field pulls in data from third party providers, such as Opta.
In terms of the JSON, a nested block, content ID and linked ID are all arrays, i.e. there could be multiple values
Blank values are handled in different ways:
- A blank input field provides a
"" - A blank select field provides a
null - A blank default block provides a
{} - A blank nested provides a
[] - If the Content ID field is left blank then it is omitted.
- If the Linked ID field is left blank then it is omitted.
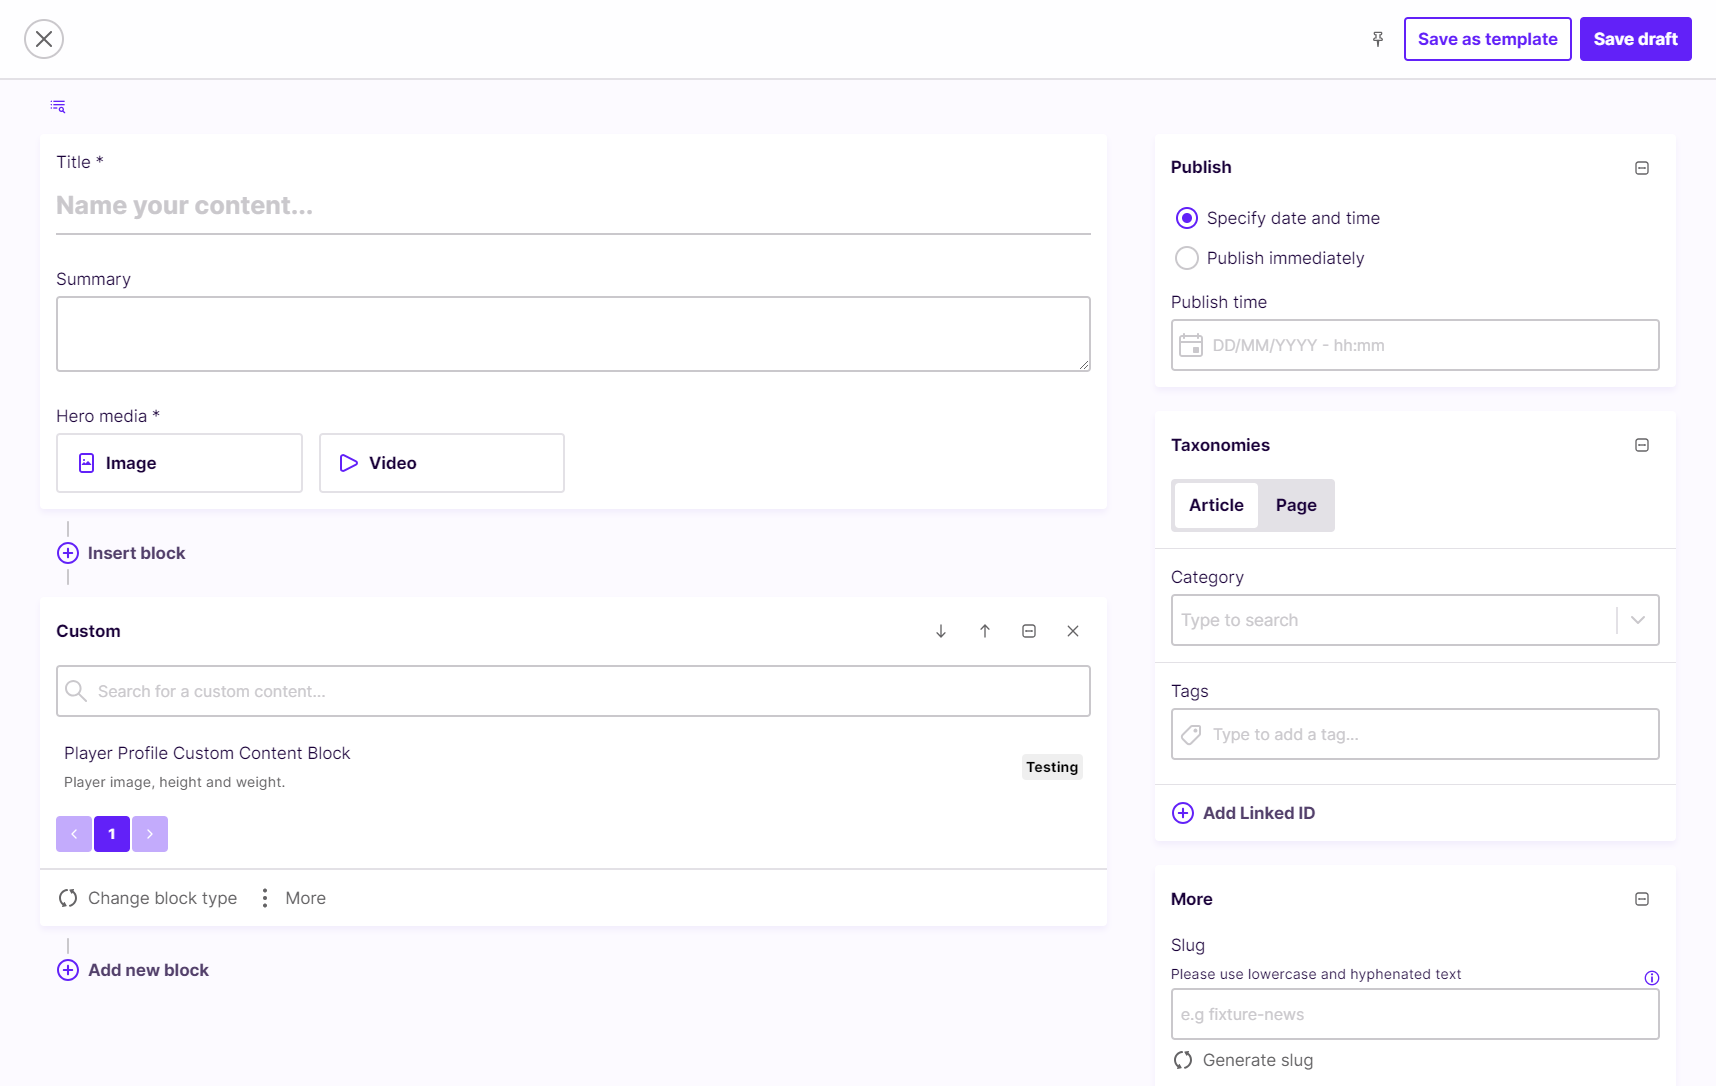
- Click Save. Now, when building an article or page in Cortex, whenever you choose Custom as your content option, as shown in the screenshot below, the custom content blocks you have created will be available for use.
Custom block creation - best practices
Custom content blocks can be powerful additions to your fan-facing web and app presence, however they should also be created with care and developer discipline if they are to function correctly. Below are some recommended best practices in building custom content blocks.
- Check carefully that what you are looking to achieve is not already covered in the standard features of Cortex.
- Complete the block and field descriptions with a comprehensive explanation of the intention behind it in order to ensure the user understands the block and uses it appropriately.
- Field names, descriptions, and values should use sentence case to be consistent with the rest of Cortex. For example “First name” is preferred to “First Name”.
- Do not hesitate to contact your Cortex administrator or account manager for help with creating custom content blocks. Working with us can help ensure the development is smooth and the outcome is successful.
A custom content block and JSON response example
This section provides a complete example of a custom content block creation for a Player of the match block. It details all the fields and shows the JSON that is generated.
Block title: Player of the match
Block description: Add this to an article to showcase the player of the match
| Field type | Field name | Field description | Validation |
|---|---|---|---|
| Input (text) | Player name | The player's first and last name | Required field |
| Input (number) | Player shirt number | The player's shirt number | Minimum: 1 Maximum: 99 |
| Select | Position | The player's position | Options: Goalkeeper, Defender, Midfielder, Forward |
| Default block (image) | Profile image | Required field | |
| Nested block | Stat | Used within the player of the match block to add up to 5 key stats | |
| Content ID | Match report | Pick the article used as the match report for this fixture | |
| Linked ID | Fixture linked ID | Pick the linked ID for this fixture |
Created block - JSON output
{
  "id": "f9c472e9-3e68-48f8-9b44-e3fb50729ce4",
  "contentType": "CUSTOM",
  "customContentType": "651fcac63851bfbbbc03ff6f",
  "customContent": {
    "fixtureLinkedId": {
      "linkedIds": [
        {
          "sourceSystem": "OPTA_FOOTBALL_MATCH",
          "sourceSystemId": "2258214",
          "text": "England Women v Germany Women (2022-07-31)"
        }
      ]
    },
    "matchReport": {
      "articleIds": [
        "736c226d-4f85-4c51-8108-17c2d17414a0"
      ]
    },
    "name": "C Ortex",
    "position": "Forward",
    "profileImage": {
      "image": "https://media-cdn.cortextech.io/4db92cef-018c-4b92-8435-26f21a571d05.jpg?crop=1890%3A2835%3Anowe%3A602%3A809"
    },
    "shirtNumber": "10",
    "stat": [
      {
        "statNumber": "2",
        "statName": "Goals"
      },
      {
        "statNumber": "1",
        "statName": "Assists"
      }
    ]
  },
  "sourceSystemId": "651fcac63851bfbbbc03ff6f"
}
Updated 3 months ago